How to Perfectly Achieve the Motion Blur Effect in Photos
Accidental blurry photos when you move your hand too fast as you are about to click that photo is the worst thing ever. But it’s more annoying when you want to add that deliberate blur to either make the picture seem aesthetically vague or to bring focus to a central subject but your vision doesn’t come through. So how can you achieve this motion blur effect and do you need to install a third-party app into your phone for it?
What is the Motion Blur Effect?
You must have seen how when you click a picture on your phone of anything, but then it suddenly moves, the results turn out to be a little shaky. You might also have noticed something similar happen when your hands get a bit while taking pictures you get that blurry effect where you can barely make out what’s in the picture at a time. This distortion, or blur is what’s called the Motion Blur effect.
You would notice this in photos, either intentionally or not, and it is usually created when the object you’re trying to capture is moving a little too fast. Almost faster than your camera’s shutter speed.
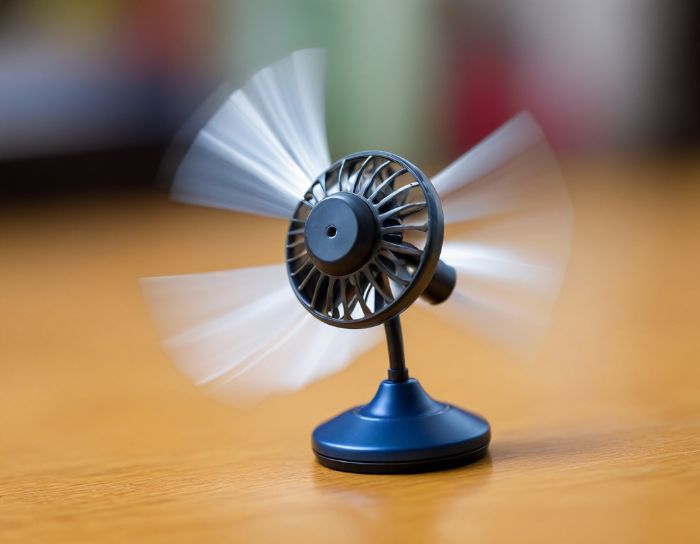
But motion blur effects are not always as accidental as they appear to be so. And there’s also a degree of aestheticism to it as well. And if you have an eye for it you will quickly learn to appreciate this photography technique.
You can actually add this effect to your picture yourself too with the help of a good photo-editing tool. Yes, Photoshop, for instance, allows you to add motion blur to a photo but Photoshop may not be the most user-friendly tool to be out there as it seems.
Other than Photoshop, there are other tools in the market, like BeautyPlus, that are not only simpler but also much cheaper, more advanced, and packed with a variety of tools to help you level up your photography game
You don’t need to out-pace your camera’s shutter speed just yet. Start by learning how to add motion blur to a photo, and you should be able to achieve the motion blur effect app exactly how you imagined it to turn out.
How to Create a Motion Blur Effect in Photoshop?
Working with Photoshop is seldom ever a piece of cake. Sure, if you are a pro, but for beginners, consider the learning curve to be a part of your learning experience. The motion blur effect in Photoshop is almost just like any other filter and is available in the Filters tab giving you the option to further customise your blur along with masking features to make your motion truly breathtaking.
But as amazing as all this sounds, getting your way around Photoshop is not something you can learn overnight to your bad luck. It does require you to invest a bit of your time to practise and not to mention that you must pay a price for the tool as well. Despite everything you want to learn in Photoshop, here’s how can get started with the motion blur effect Photoshop.
1. Start off by opening Photoshop on your PC, and then browse through your photos files to pick out the picture you want to add the motion blur effect to.
2. On the Photoshop toolbar that is at the top, you will have to find and click on the Filters tab, and then proceed to go to the “Blur” option in the drop-down menu.
3. As you hover over the “Blur” option, you will notice a flyout menu pop out, and as you will have all the blur options to choose from, find the “Motion Blur” option and click on that.
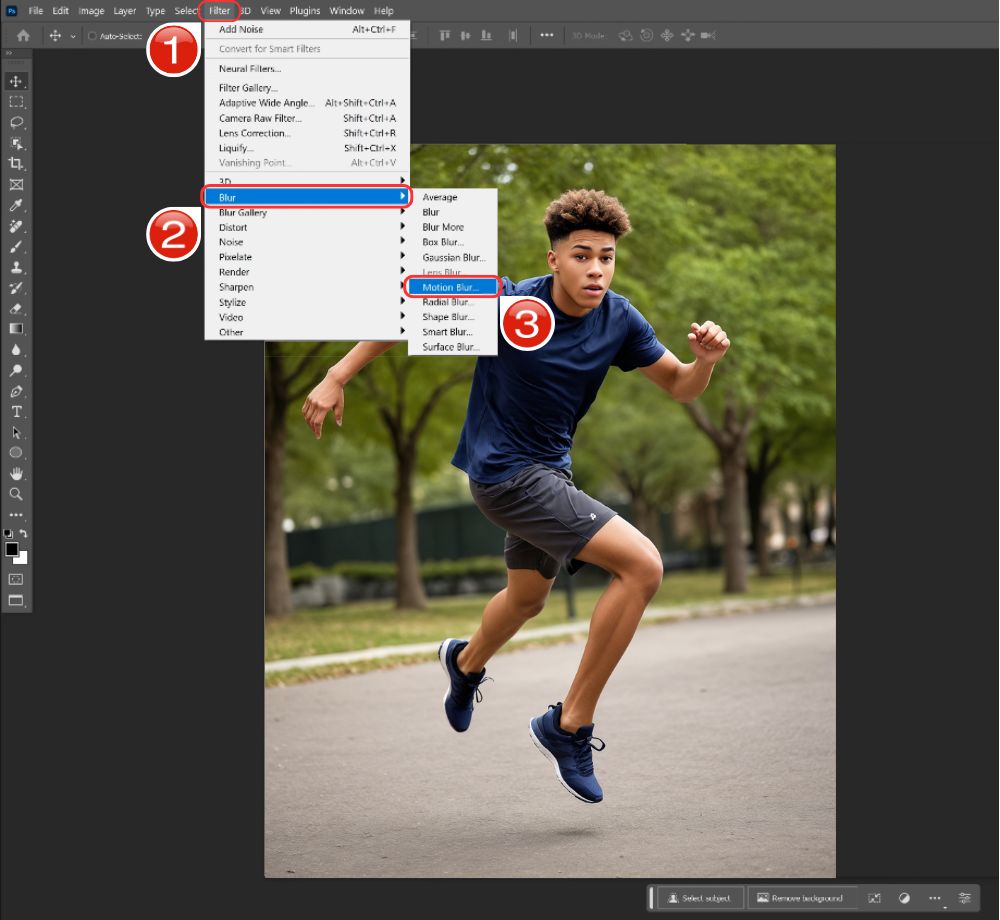
4. You will have the option to work on with a few of the Motion Blur settings such as Distance, Angle, Tilt, before clicking on “OK” to apply the effect on your image.
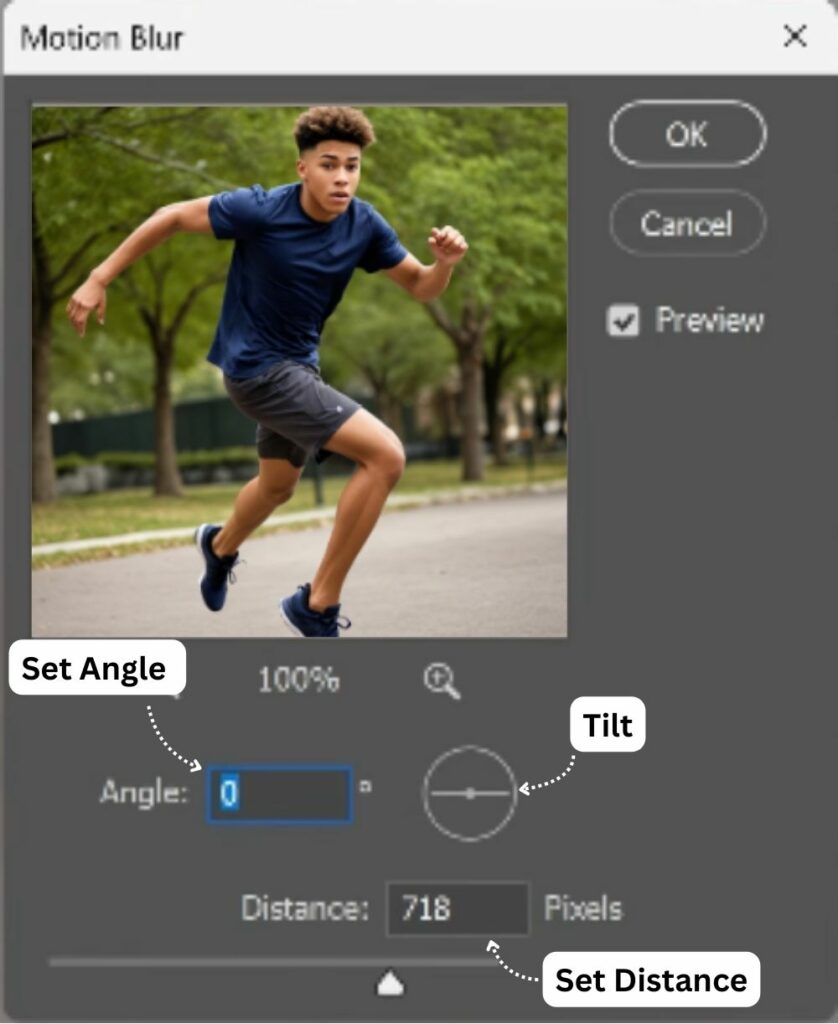
Now that you know how to add motion blur to a photo, you can further do a few more things, such as working masking, applying other effects, changing the colours or applying gradients etc. It is after all photoshop, you have all the photo-editing tools to further enhance your photo however you like.
How to Create a Motion Blur Effect with BeautyPlus App?
BeautyPlus is packed with some cool tools, and unlike complex photo-editing tools, BeautyPlus is all about making editing easy for everyone. With the AI inclusivity, you get a package full of filters and effects, and all the editing tools packed in a single app, BeautyPlus has become a must-have app for everyone who likes taking pictures but needs that lowkey app to add touchups to it to enhance the picture.
Just like all its tools, you will find how to add motion blur to a photo in this app very easy to use. With a slider to adjust the intensity, and AI capabilities which separate the background and the object, BeautyPlus’s motion blur effect iPhone or Android, is the simplest to use. Let’s see it in action:
1. Open the BeautyPlus app, and tap on the “Start Editing” button, and then proceed to select your image.

2. You will be taken to the BeautyPlus editor, here tap on the “Edit” tab.

3. Scroll towards the right on the edit tab to find the “Blur” option and as you do, tap on it to select it.
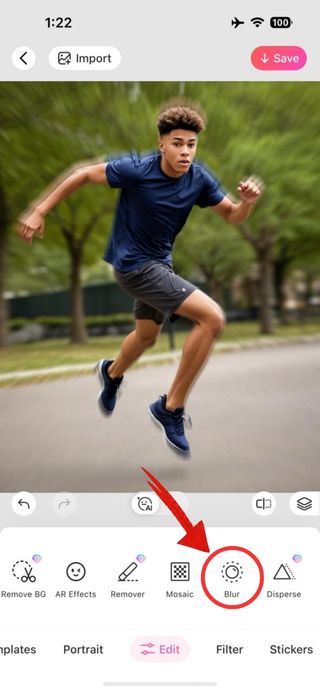
4. Once selected, you will find many different blur options to apply to your image. To apply the motion blur effect on the app, scroll and tap on the “Radial” blur option.

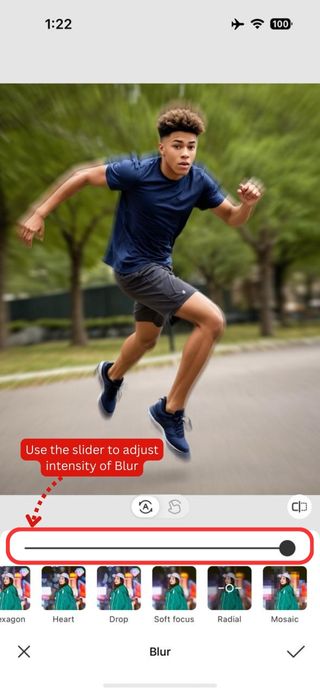
5. One great thing about BeautyPlus is that it allows you to easily apply the filters, simply use the slider to adjust the intensity of the motion blur.
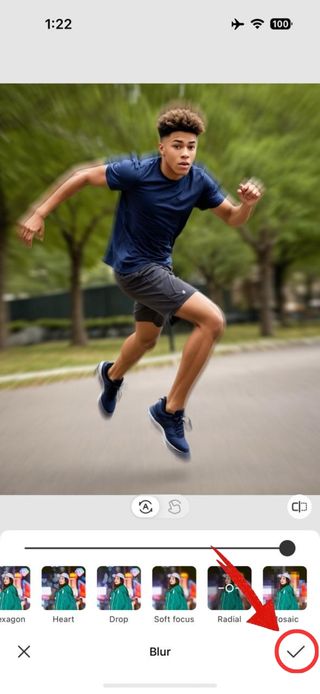
6. Once the effect has been applied, tap on the “tick” icon to exit the Blur tool and then tap on the “Save” button on the top right to save the image.
Once you have the right photo editing tools out of the way, your experience with adding the motion blur to your photo would appear as if it took you no effort at all. Photo editing doesn’t have to be complicated with all the complexities of tools and layers to do it. With AI inclusive apps like BeautyPlus, you can have this luxury of developing the photo to fit your aesthetic in seconds. And no, you are not just limited to the motion blur option, BeautyPlus has so much more in store for you.
Bottomline
Pictures where you see the motion blur effect likely have a lot of work put into it. Special cameras, waiting for the perfect lighting, adjusting the tones of the picture. But at the end of it all it is all worth it. You can spare yourself this nuisance of not just experimenting with tools, but certain tools like Photoshop make one want to learn an entire tool from scratch. BeautyPlus is a great option to consider for a quick and easy fix that comes off looking professional and is suitable for all your photography needs.


