
How to Add Text to Photos in Just a Few Simple Steps
In this time and age, if you don’t know what a meme is, you’re practically living under a rock because you have been missing out on a lot. But if you have long discovered them and finally decided to give it a go yourself with that funky picture of your friend that you took a while ago and you have the most perfect caption in your mind to give them a taste of a little lightweight embarrassment. Add that text to the picture, and you have a meme material picture ready to be up on school lockers.
Now adding text to an image may seem like the easiest thing in the world, but we can agree that it can be a bit of a headache and that we probably underestimate the effort required in it. In no time, you too will figure out how to add text to photos, with the most creative fonts that speak to both your audience and relate to you or your brand or even bring the meme out to life.
How to Add Text to Photos with BeautyPlus
A good photo editor is something that everybody should have at their fingertips at all times. You should be prepared with a good photo editor such as BeautyPlus before any emergency so that you are always equipped with all the major photo editing tools, and it will be relieving for you to know that BeautyPlus is an app that aids in both simplicity and accessibility for anybody who wants to use it as a frequent photo editor.
For example, you can add text to your image and then further customize it by giving it a little color, a few stylish fonts for texts here and there, and even customizable styles in terms of “accessorizing the text” and they’re easy to use. And for when you want a clearcut demonstration, you can always refer to these steps below on how to add text to photos using BeautyPlus:
1. The first step is to go ahead and download the BeautyPlus app on your mobile device, and since it is available on both Android and iOS, you can easily get it on either Play Store or App Store.
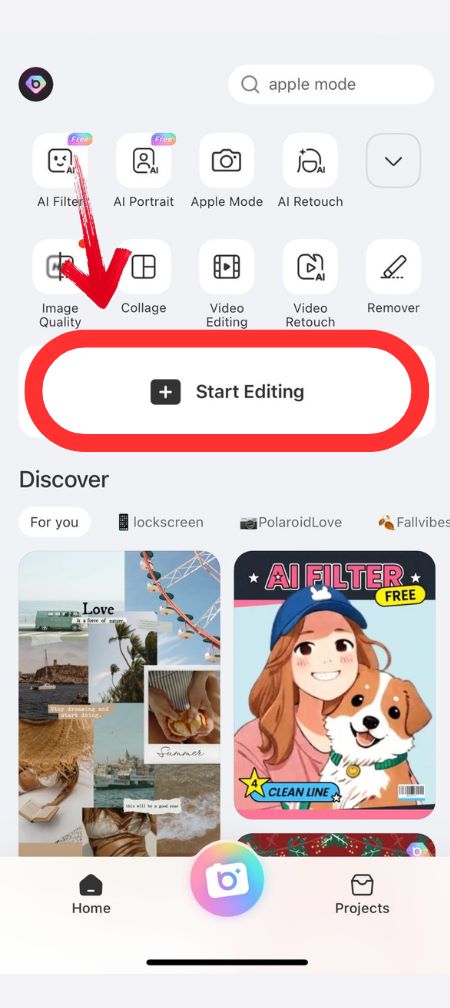
2. With the app now completely downloaded and ready to use, tap on its icon to open and tap on the “Start Editing” button.
3. Now, you need to select a photo from your gallery, so browse through, it and select the photo that you want to add your text to.
4. You will have a variety of options arranged under tabs. To add text, you will need to swipe left and tap on the “Text” tab at the bottom toolbar.
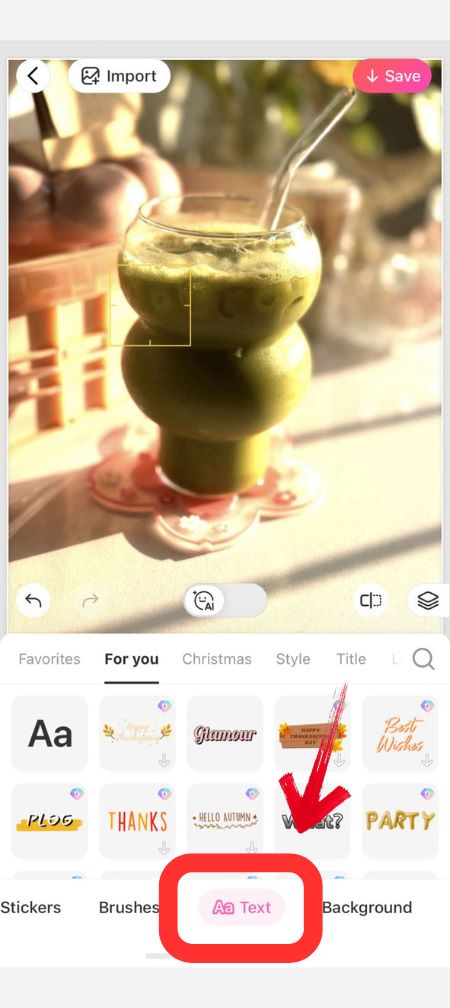
5. All the available text styles will now be displayed, you can browse through and select the style that you think compliments your image.
6. No need to worry about the text features. Once you have selected a text style, you can then tap on the “Edit” icon on the text box to edit it completely; color, alignment, font styles, and etc are all there for your editing assistance.
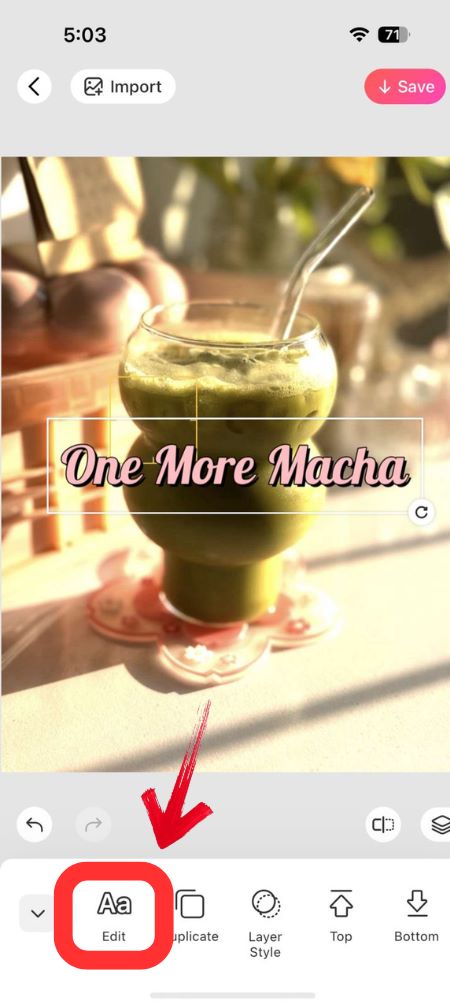
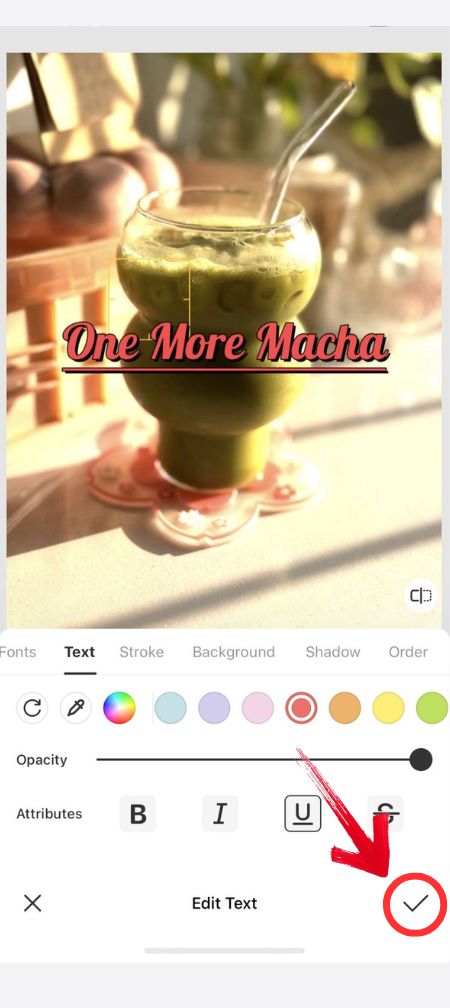
7. Think your image is now more contextual, if not, you can edit the text or add more to it to preference, and then next tap on the “Tick” icon to exit the text editing screen.
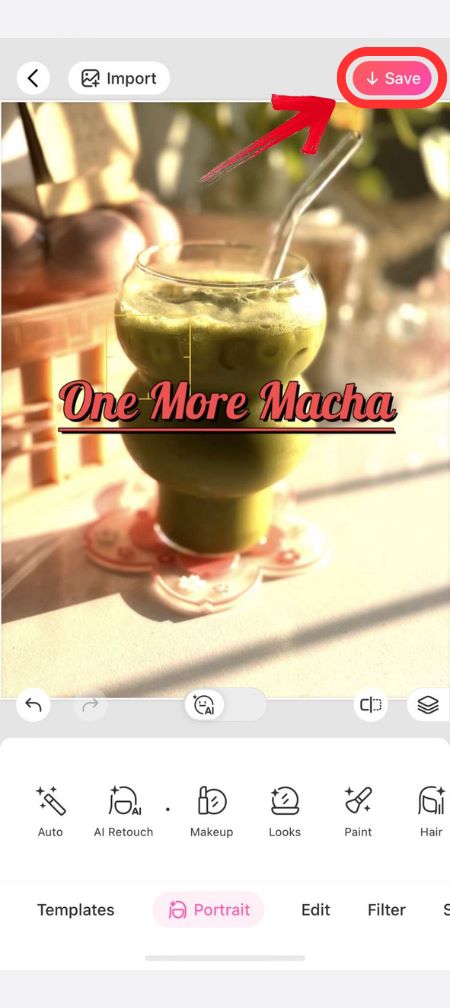
8. You can save the image to share it with others by tapping on the “Save” button on the top right.
How to Add Text to Photos on iPhone
Your iPhone is by far the handiest device you likely have. You can perform virtually all these functions within different applications all at a tap of your fingertips and editing pictures on your iPhone to add text in them is just as easy. Here’s an easy way to do it, and you can do it all from your photo app! Just follow these steps:
1. To get started, open up your photo app and pick and choose any photo you want to add text to.
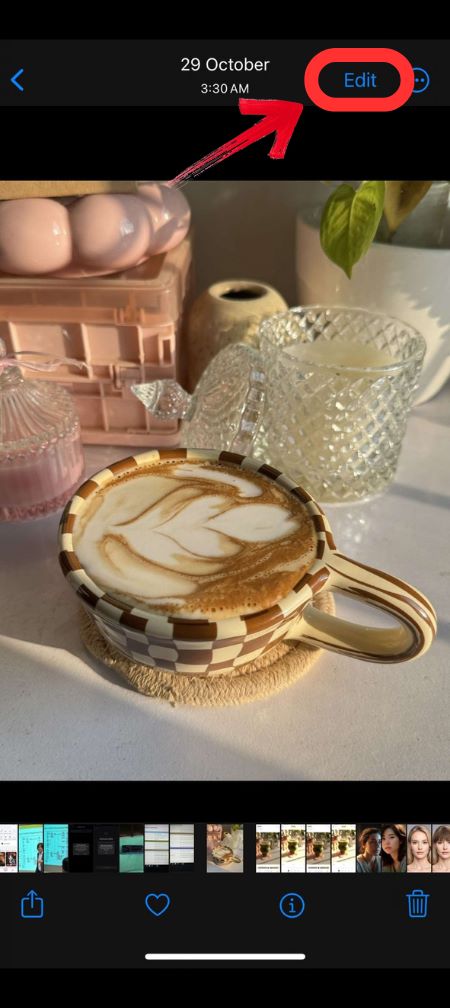
2. At the top of your screen you would want to look for a button that says “Edit”, and as you spot it, give it a tap.
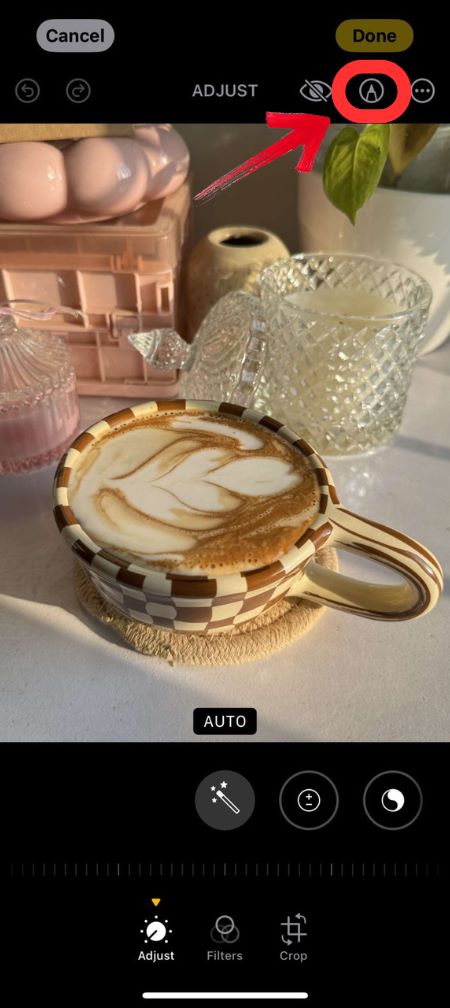
3. You’re now in edit mode. At the top, you’ll see a little icon for “Annotations”. Go ahead and tap on that.
4. On the right-hand side, you’ll notice a “+” icon, tap on that icon.
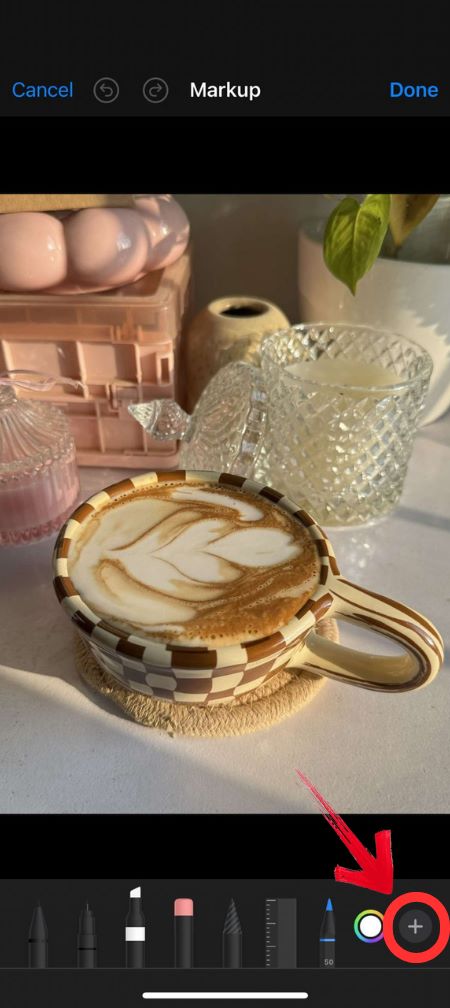
5. You are now in the final phase of adding text where you’ll see an option to “Add Text”. Tap it, and a text box will appear on your photo where you will type in the intended text.
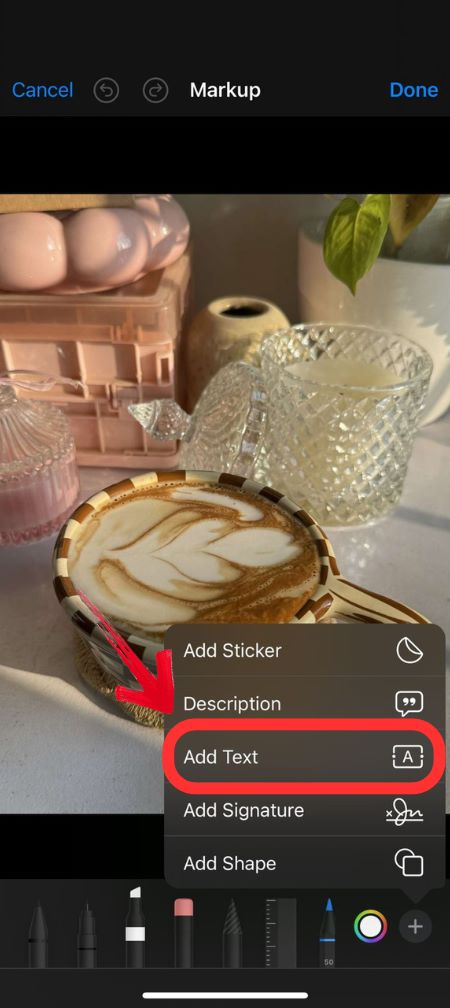
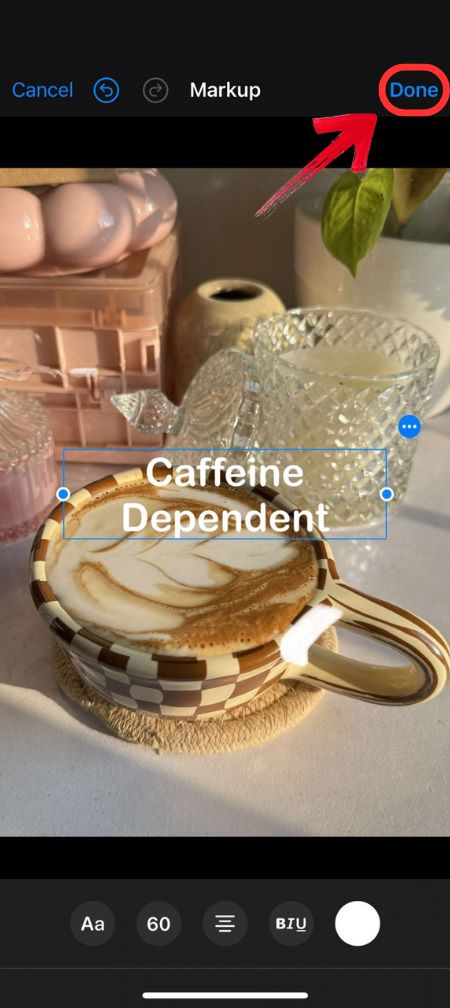
6. To make sure that the text really goes with the image, you can move the text box around, change its size, font, and color, and even adjust the alignment of how the text is placed.
7. Once you’re happy with how your text finally looks, you may proceed to tap on “Done” located at the top right and leave the Markup mode.
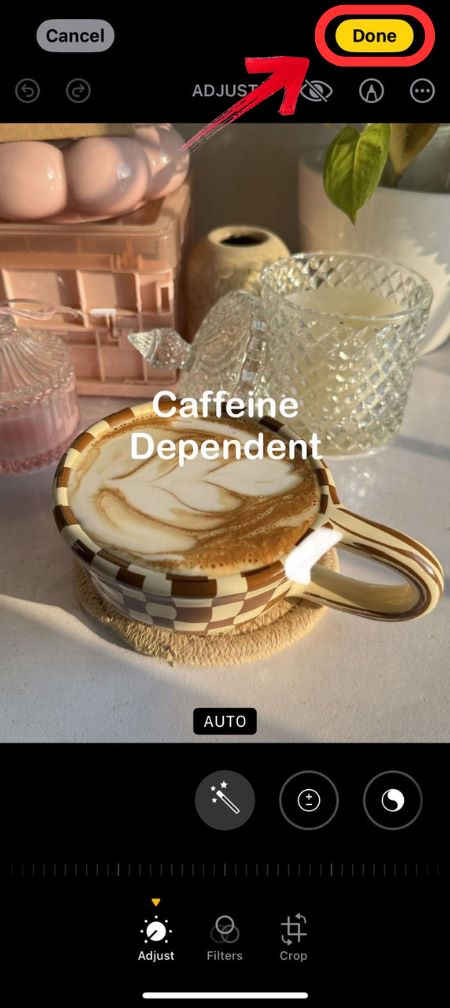
8. Lastly, to save your finished work, once again tap on “Done” and you will get a perfectly sharable art piece or poster to post it around and get your message through the poeple.
How to Add Text on Photos Using Google Photos (Android)
It’s no hidden secret that Google Photos has a store full of editing pictures from filters to color grading options, to resizing options. One of the markup tools that Google Photos offers is adding text to your images and its interface is the simplest to work with, regardless of your technical understanding of how Google Photos work. But if you don’t want to invest time performing trial and error figuring out how to add text on Google Photos, you can follow these steps thoroughly:
1. You will need to select a photo to begin, so, go to Google Photos and quickly find a photo on which you want to add your text.
2. Once you have the photo displayed right in front of you, you can make a start at editing tap on the “Edit” button, which you should be able to find at the bottom.
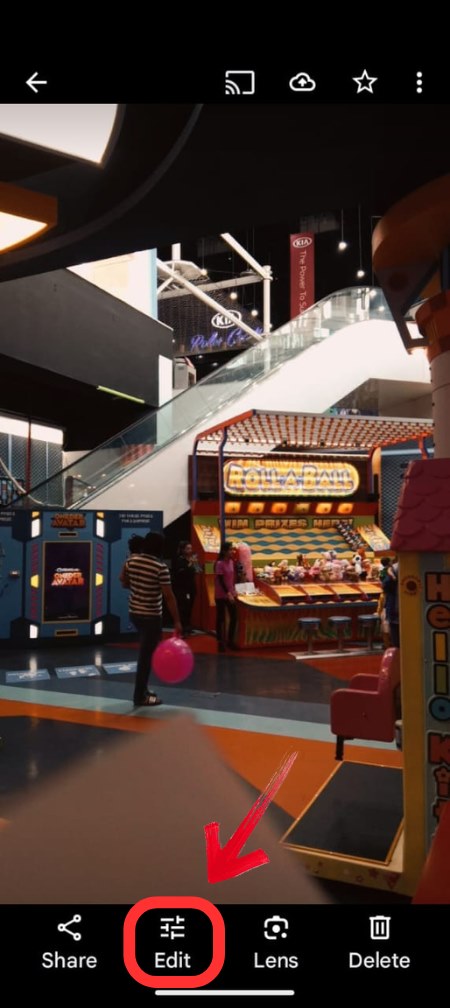
3. Taping the edit button should make all the tools appear in front of you. Head to the toolbar and swipe left until you find the “Markup” option.
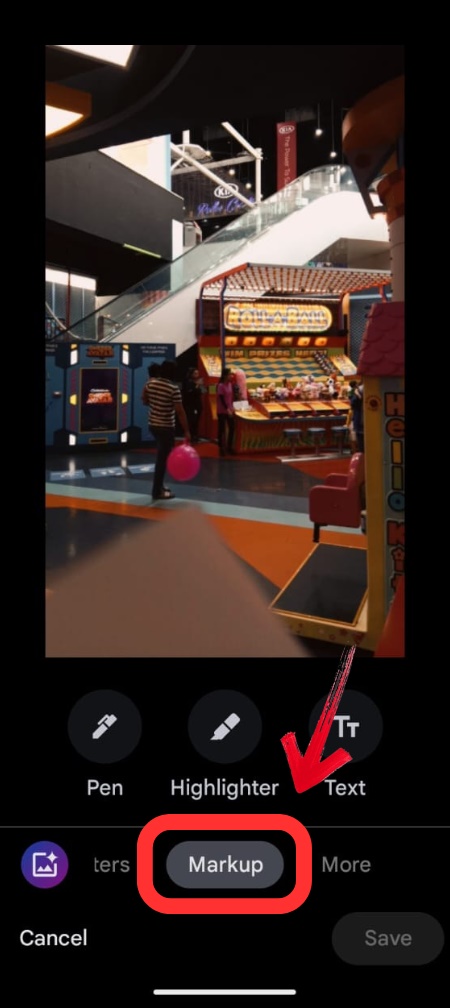
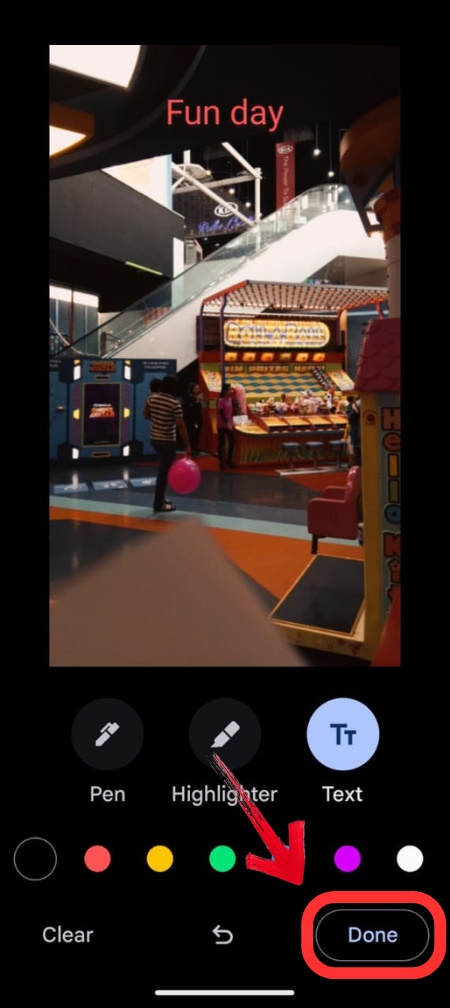
4. In the section of Markup, you will see that there are three options for you to accessorize your image with; Pen, Highlighter, and Text. In this case, you would select “Text”.
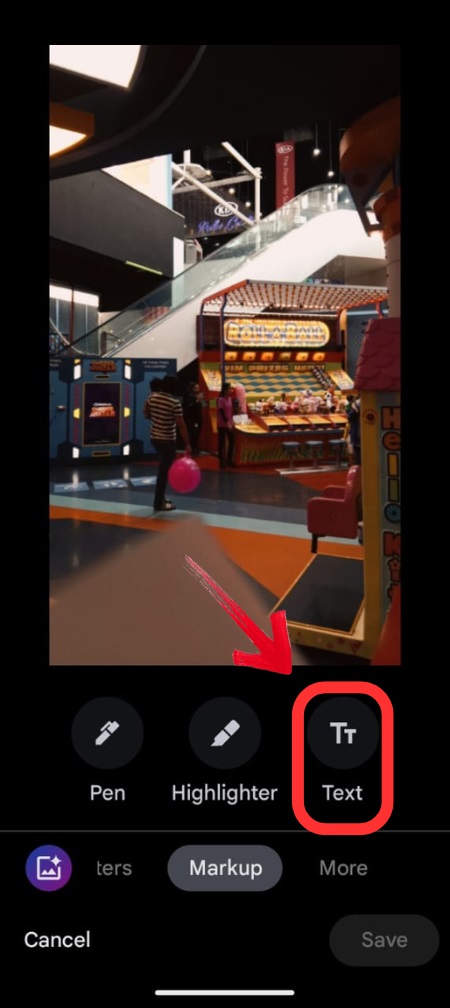
5. You will be displayed with a textbox that says, “Type Something”. In the textbox, enter the words you have been waiting to put on your image, and tap “Done”.
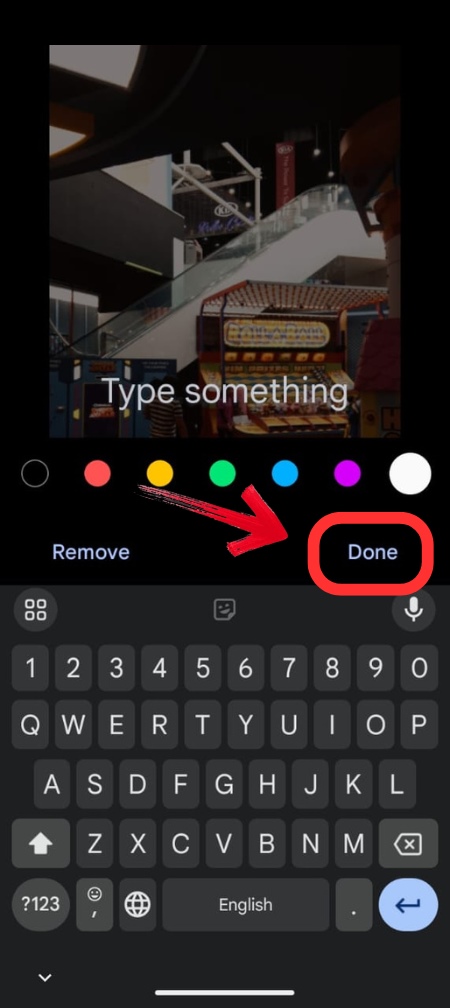
6. Now that the texts are all on the image, you have the option beneath your textbox to change its colour and add depth to the text. Go ahead and choose the colour of your choice.
7. To improve the quality even more, you can tap and hold your text to move it to a more appropriate position where the text may appear visually appealing and engaging.
8. Once you’ve completed the Markup section, simply press the “Done” button at the bottom right to finalise your edits.
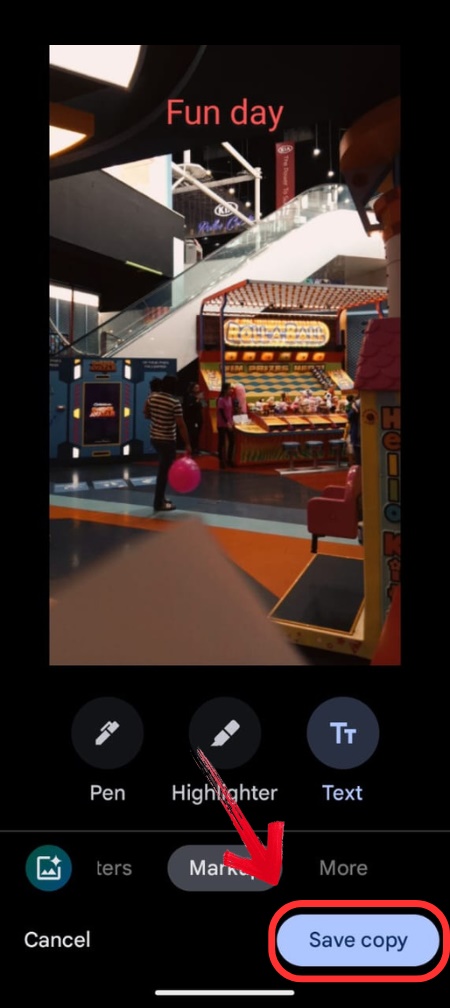
9. To finish everything off, tap “Save Copy” to create and save an edited version of your original in the same folder.
How to Add Text to Photos with Instagram (Both Android and iPhone)
Instagram is a social media app that has millions of users across the globe. Instagram is well-known among the community of users for establishing connections via sharing content pieces like pictures and videos.
The interface does not discriminate between phones, so an Android user and an iPhone user will have relatively the same interface to work with. Some of the features of Instagram include adding text to your images. It is not at all complicated either and to have access to them follow these steps.
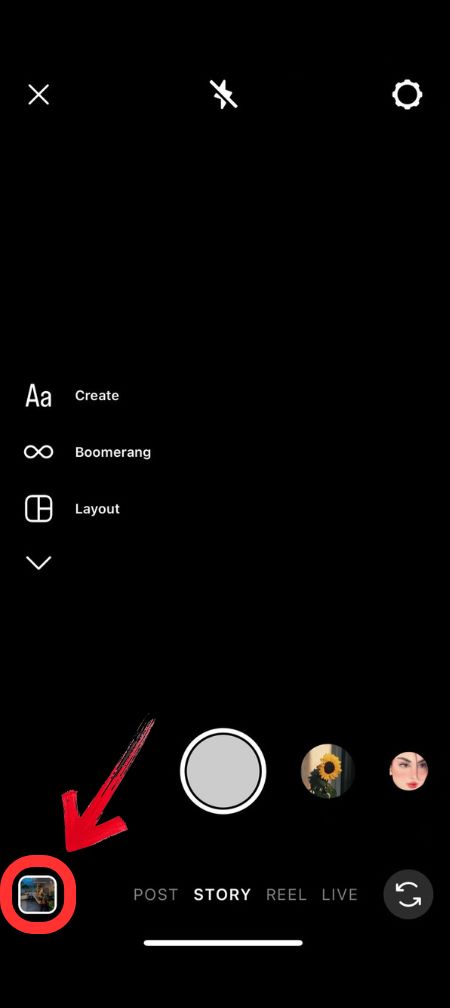
1. To add text to your pictures, you will first have to open Instagram and go to its story section.
2. Once there, tap on the gallery icon at the bottom to the left side, and browse through the media to find the image to which you would like to add text.
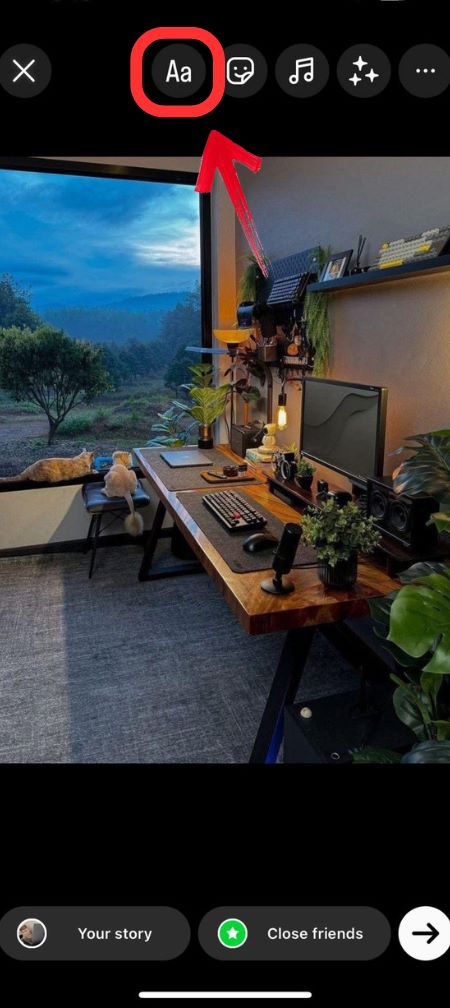
3. To be able access the textbox, just press the icon “Aa” located at the top.
4. Now, for the most awaited part; add the text to your text-free image! Feel free to type either a line or a paragraph.
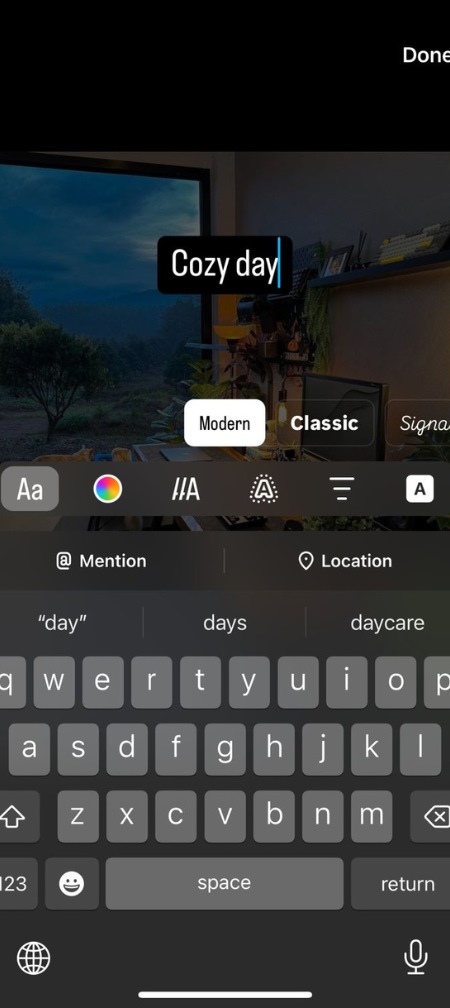
5. To make your picture more aligned with how you want the intended context to be, you can take complete advantage of the tools Instagram has in stores for you where you can change the alignment, font, and colour of your text at full convenience.
6. And it does not end there. You can also add effects to your text where you canmake it more bold, such as the effect of Typewriter, Pop, and Neon.
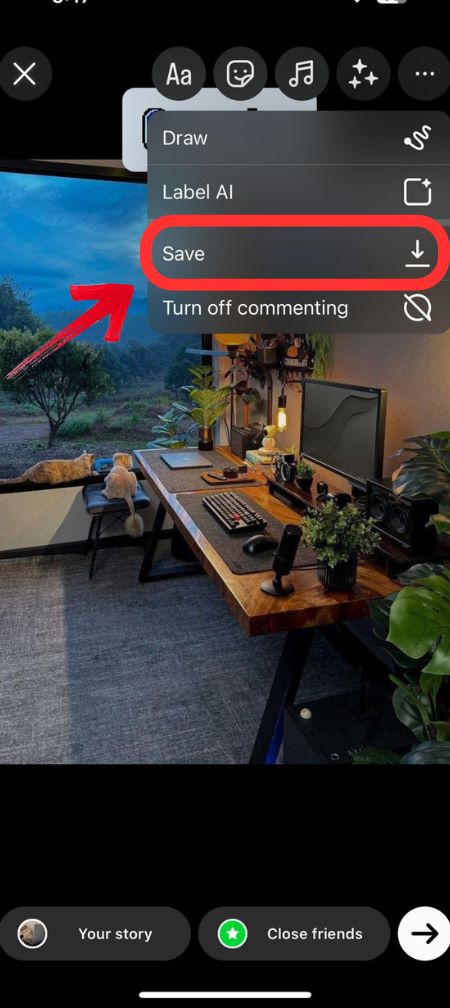
7. Now, you get two options; you can either post it on your Instagram story immediately to share your edited image or you can tap the three-dot icon at the top, and tap “Save” to save your work.
Bottomline
On a random day when you come up with something so uniquely authentic and have the urge to share it with the world by adding that text to that aesthetic picture you took, you are struck by the realization, that your photo editing skills are apparently not the best. There are so many tools now in the market that beyond the paint tool we used to use as kids to add text to image. Today with tools like BeautyPlus, you can channel your ideas in its most raw and authentic form connecting with more and more people alike.

