
2 Easy Methods for Perfect Sky Photo Editing

When it comes to capturing an Instagrammable photo, some aspects of the image can never be ignored. For example, the background scenery, the sky, and brightness.
Therefore, have you ever clicked pictures where you looked beautiful, but the bad weather destroyed your image because of the dull sky? If you’ve been through that, you do not need to be bothered about it anymore, as you can do sky photo editing by using online tools and a few seamless steps.
So, let us find out how BeautyPlus and Photoshop can help you visualize the beauty of amazing landscapes in your images and how these tools can create unique skies in your pictures.
Part 1: How To Change the Sky in Photo With BeautyPlus?
Beauty Plus is an easy tool that allows users to choose their favorite sky filter and apply it to the desired picture. This is how even the dullest sky-backdropped images are converted into spectacular ones. Now, let’s dive deeper into the specifics of sky editing with Beauty Plus.
Steps to Change the Blue Sky in Photo With BeautyPlus
To edit photos on BeautyPlus, do the following:
Step 1 – Open/Download BeautyPlus App
You are supposed to either open the app or download it, and for that, you are supposed to go to either an Apple Store or a Play Store to get it. Without the app, you will not be able to access the Sky editing feature.
You can skip this step if you already have the app on your phone.
Step 2 – Go to AI Filter

Now, on the second line, you should see “AI Filter” and click on it. You will get the filters to change the background image of your choice, including the sky filter.
Step 3 – Upload the Image

In case the AI filter option was selected, your gallery is now open. Choose the image that you want to be edited from the selection.
Step 4 – Switch Over to Sky Filters
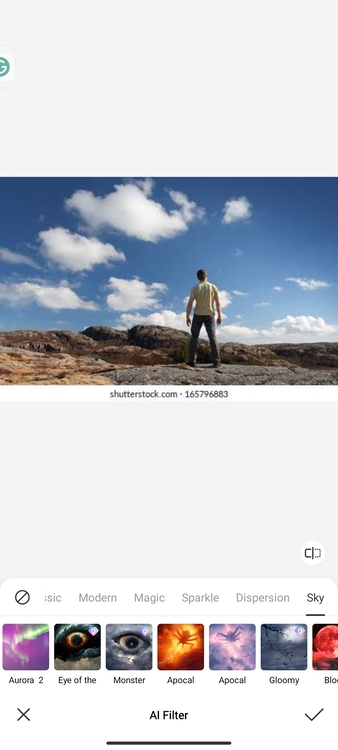
Once the needed image has been uploaded, go over to the right end of the AI filter options and look for the ‘Sky’ menu. Click on this menu, and you will find several skies to use while editing your image.
Step 5 Hyaline Filter
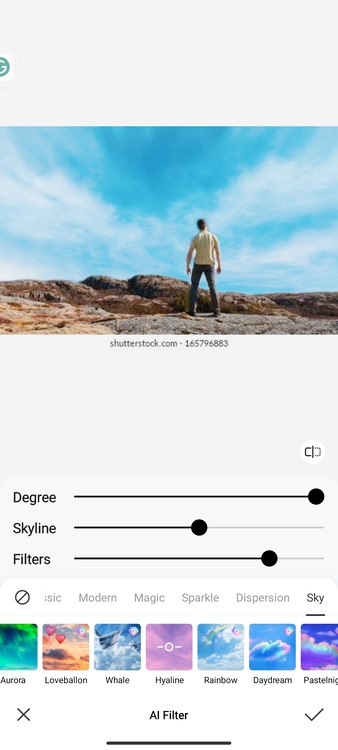
The Hyaline filter is the blue sky of all types. Hence, if you want a blue sky background which is very natural, go for this one.
Here, you can adjust the following factors in the image,
- Degree
- Skyline
- Filters
Step 6 -Flood the Picture

Allow the image a few seconds to get the correct background, and then finally save the picture.
Methods Of Using the BeautyPlus Software to Insert a Moon Within the Image

You can take images of the moon alone, but at times you might want to add it in an image with a clear blue sky. ” There’s a certain procedure to follow in this case,
Step 1 – 4
For the first 4 steps, just like the instructions on how to add a blue sky, those are the same, only this time you will need to,
- Launch the application ‘Beauty Plus’
- Press on the AI Filter
- Upload the picture
- Make sure to scroll left while clicking on the menu until you reach the ‘sky’ option
Step 5 – Select ‘Mist Effect’
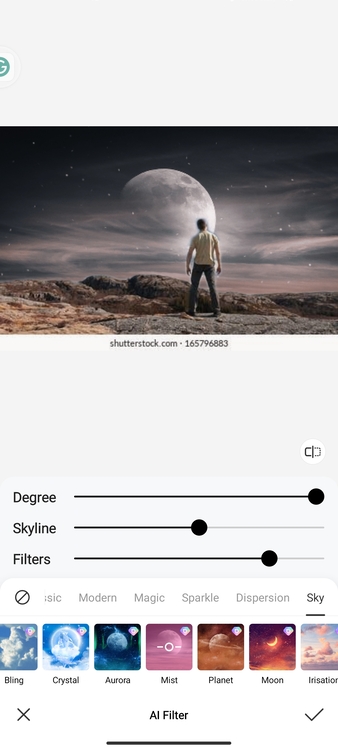
Honestly, while scrolling through the given options, there is one which says “Mist.” This mist option is what inserts a gigantic picture of a moon in the background of your image.
In addition to these two options, you can try sky effects like bling, cloud, sakura, irisation, crystal, and night.
Step 6 – Save the Photo

After finalizing the image, the next step is to save it. So, let the image process for a few seconds and download it.
Other BeautyPlus Filters for Editing Sky
Let us talk about some other sky filters available in BeautyPlus for your pictures.
Aurora

Imagine editing a sky with beautiful flashing Arora lights in the background of your basic image without even visiting areas with northern or southern lights.
BeautyPlus gives you the liberty to do that. Some of its similar filters include,
- Aurora 2
- Galaxy
- Aurora
- Rainbow
- Sparkle
- Crepes
Love

Although bringing the moon from the sky into the earth won’t be possible. You can show how much you love someone by adding Love in the sky of your best picture. For this, you have some filters of BeautyPlus like,
- Love
- Love 2
- Butterfly
- Heart bubbles
- Balloons
- Love balloons
Apocal

How about being the superhero in your images and writing a fictional story with you as a hero? Well, Beautyplus has many supernatural sky filters to add a touch of thrill to your pictures. These include,
- Monster
- Eye of the monster
- Apocal
- Apocal 2
- Gloomy
- Gloomy 2
- Blood
- Whale
Firework

Fireworks always look better in person than in pictures as mobile cameras cannot capture their sparkle. Therefore, how about adding big fireworks in the sky with BeautyPlus?
Part 2: How to Change the Sky in Photos with Photoshop?
For working on the computer and taking your sky editing to an advanced level, you can try Adobe Photoshop and use its sky replacement Photoshop feature to turn your dull sky background in the photo into an enchanting one.
Here are the steps to do it.
Step 1 – Upload the Image with the Sky
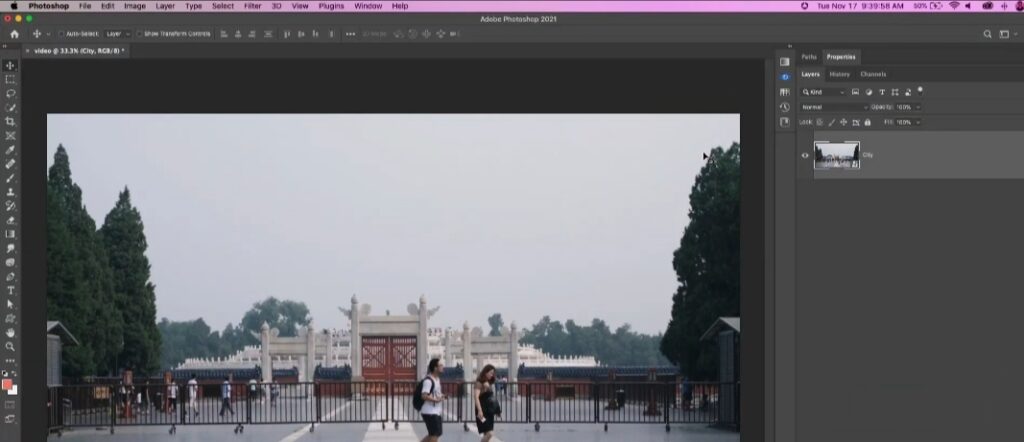
First things first, open “Adobe Photoshop” on your computer and sign in to an account if you do not have one already.
After signing in to the account,
- Click on the “File” option you see on the top left side of the screen
- As the drop menu shows up, hit the “Open” option
- A window with pictures from your gallery will open up
- Upload the image you want to edit
Step 2 – Click on the Edit Option
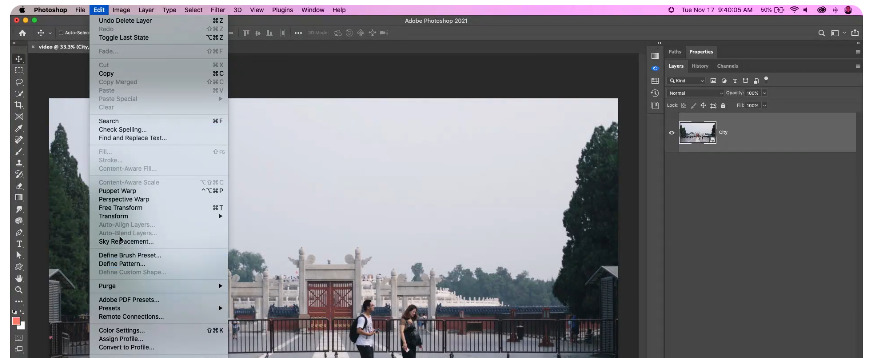
You can upload any picture you want to replace the sky. As you upload the picture, it is time to start editing. For this,
- Just right to the “Files” menu, you will see an “Edit” Option
- Click on the Edit option and find your target editing menu from here
Step 3 – Go to AI Sky Replacement
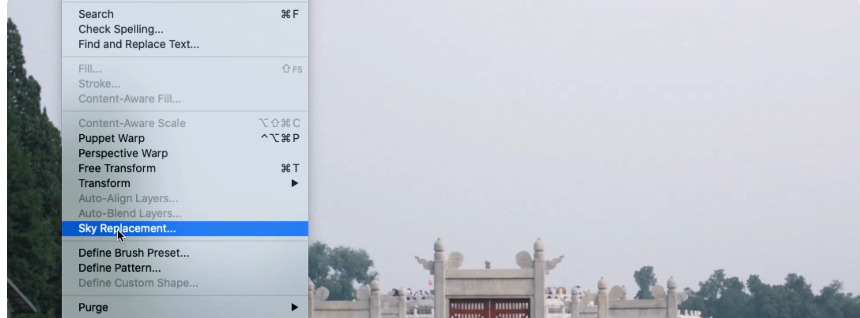
Here is what to do in the edit menu,
- When you scroll down the “Edit” menu, you can find the “Sky Replacement” option.
- Hit this option and see a window of sky editing options open on the right side of the screen.
Step 4 – Try Different Sky Options
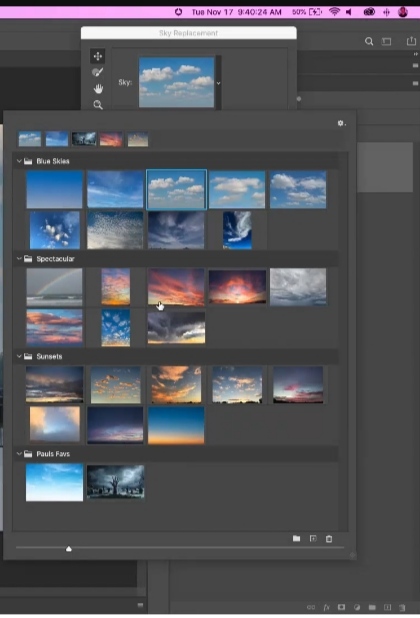
To access a set of backgrounds, open up the provided image using the link above and click the arrow on the right side of the image.
- You have the option of selecting stunning skies, a blue sky, and much more.
- Using the App, the Photos sky can also be replaced so the sky isn’t always a constant feature of the photo.
- Moreover, if you scroll down the edit option, you can see the add sign – clicking on it allows you to add a picture of the sky retrieved from your gallery.
Step 5 – Make Changes in the Image
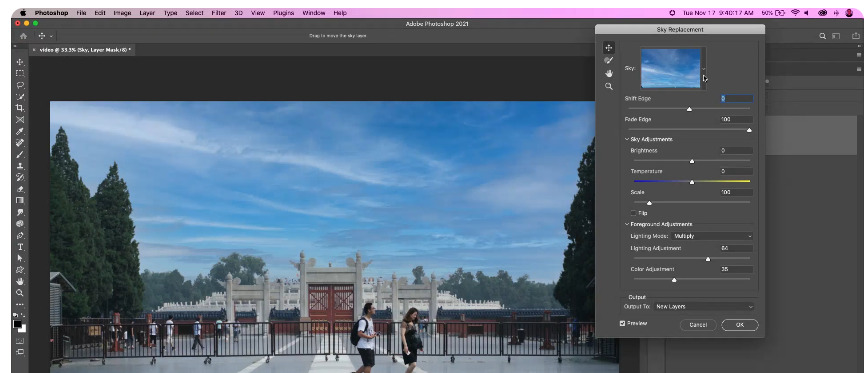
- Edit other parts like temperature, color, and brightness to make it look a little realistic.
- Finally, for every other editing option available, please click on the “OK” option available on the bottom screen.
Step 6 – Save a Copy of the Image
At the end, make sure you save the edited image in your device gallery. To do this,
- Click the Files Menu option available at the top left of your screen.
- Drag the menu bar until you are prompted with the “Save/Save As” options.
- Next, click on the relevant option
- Then choose your desired location where you wish to save the image.
Conclusion
Changing the background of pictures using any AI tool is pretty straightforward but in the BeautyPlus camera app, one can use the AI filter effect that removes the background.
With Adobe Photoshop as well, the Sky Replacement feature is useful. So it’s high time when you can start editing your pictures for good.


