How To Restore Old Photos And Revive Their Original Charm
It’s a pretty old practice to keep old things from your past for memory’s sake, such as old letters, gifts, postcards and of course pictures, that hold the most important and valuable moments from our lives. And given that with time the photography and the image quality have improved so much, the older generation did not get to enjoy this luxury.
Today we are not only blessed with the modern camera but with modern photo editors as well that can help you with how to restore old photos and bring them back to life even after some deterioration.
1. How to Restore Old Photos on iPhone
Photo editing on your iPhone is possibly the easiest and the most convenient form of photo editor than you have. We know that iPhone built-in photo editing features may not be as encompassing as you want them to be. it does a pretty good job at fine-tuning the picture, adjusting the brightness and adding filters to give your photos a polished look, but it lacks in many other areas, one of which includes restoring old pictures so they look as if they were shot in this modern age.
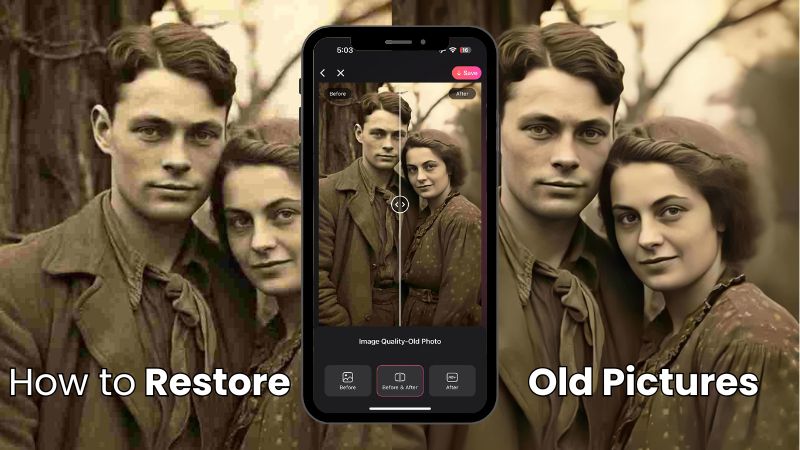
BeautyPlus is an app that is highly compatible with both iOS and Android and offers many beautifying and complex photo editing features, which also include photo restoration.
And unlike many other tools, it doesn’t just stop at removing the blur but goes the extra mile by enhancing the overall quality of the image. BeautyPlus not only sharpens blurry areas but also smooths out imperfections, brightens skin tones, and removes blemishes, making it a comprehensive tool for beautifying your photos.
1. Open the BeautyPlus app on your iPhone. It is free to download so if you don’t have it installed, you can easily “Get” it off the App Store.
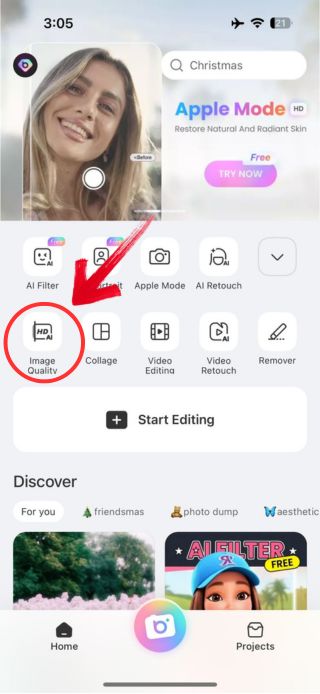
2. Upon opening the app, you will find the “Image Quality” tool above the Start Editing button. Tap it to begin.
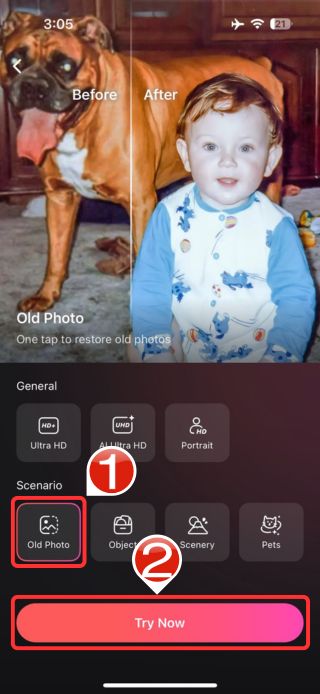
3. You will find many options featuring enhanced photo quality, you would want to select “Old Photo” under “Scenario” if you are looking to restore an old photo specifically and then proceed to tap “Try Now”.
4. The app will prompt you to open a picture from your gallery and choose the old photo you would like to revive.
5. BeautyPlus will take a couple of seconds to prepare the results before your photo will be restored to perfection!
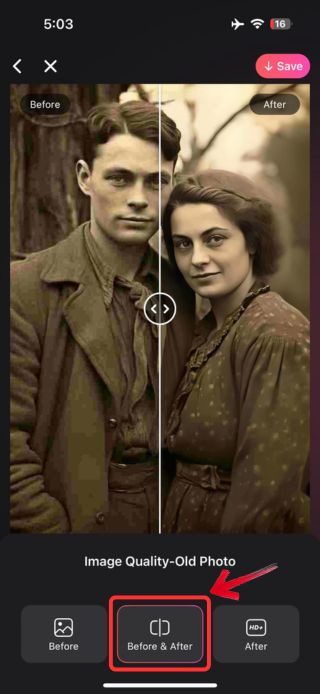
6. You can use the “Before & After” button to compare the difference between your original and the enhanced photo, this feature helps you realise the true essence of a photo in the best light.
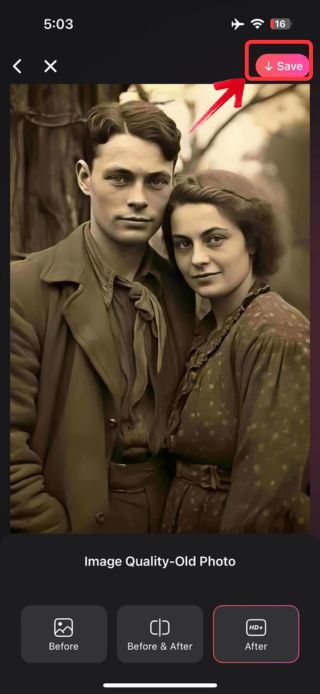
7. With your old photo now restored to a more modern, high quality image, tap on the “Save” icon on the top right to save your restored image.
Pros
- Ease of use
- Compatible across both iPhone and Android
- Premium quality results
- Free to use
- Before and After Feature
- Intuitive operation
Cons
- No manual controls
- Internet connection required
2. How To Make Blurry Pictures Clear Using BeautyPlus Online
Beautyplus will show you the true colors behind every photo of yours with the help of its image enhancer tool. It is possibly the easiest tool that you can use to bring clarity to the picture. Now, beautyPlus has become quite notorious over the years thanks to being popular among millions of users because of its beautifying features, which enhance the features in a way so you look your best.
It’s safe to say that BeautyPlus’s enhancing abilities have come a long way, and when it comes to your old photos that are too blurry beyond recognition, they might have a chance at salvation.
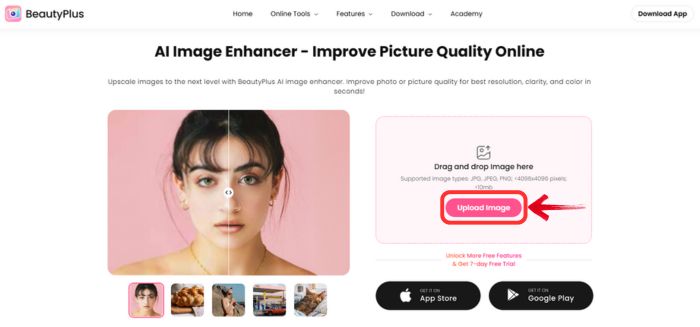
1. Open the BeautyPlus tool on your browser and at the “Online Tools” tab you will find the “AI Image Enhancer” tool. Either follow this step as is or simply click here to be redirected to the Image Enhancer page.
2. The page will prompt you to upload an image of your choice by clicking on the “Upload” button. Upload the image you want to restore or remove blur from in the supported file formats of JPG, JPEG, and PNG.
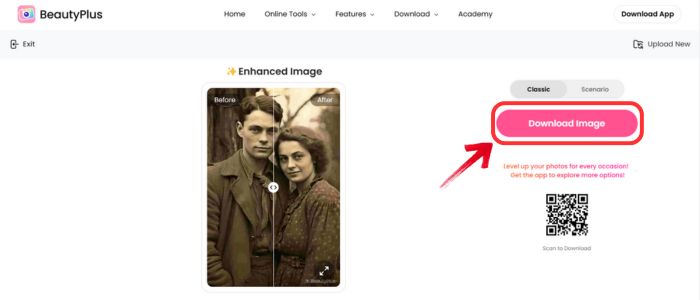
3. The tool will process and take a couple of seconds before you have your perfect, detailed, and crystal-clear photo ready in no time!
Pros
- Easy to use
- Supports major file formats
- Free to use
- Adds natural clarity
Cons
- Internet dependency
- Ads on free version
3. How To Restore Old Photos Using Photoshop
People tend to shy away even when they have an easy way out with Adobe Photoshop. Somebody who is new to photo editing might easily get intimidated by Photoshop and its technicalities, so while it’s no secret that Adobe has this learning curve to it, restoring old photos isn’t all too difficult at all!
Adobe Photoshop has simplified many of its features, ever since its integration with AI by offering custom filters that allow you to simply implement it on your images and get an instant result with fine-tuned image enhancement, facial enhancement, and scratch reduction sliders to adjust the results to how you like them to be!
1. Let’s begin by first importing your old scanned image on Adobe Photoshop app. if you don’t have it downloaded, you might need to buy its subscription plan and download it to use its full features.
2. With the old photo now loaded on Adobe, create a duplicate layer to get started.
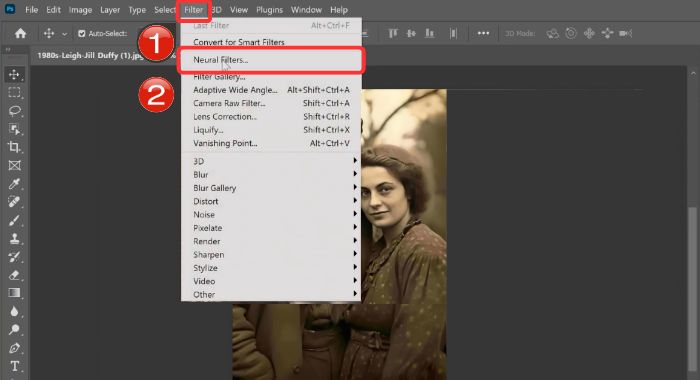
3. Once you have the duplicate layer added, select it and head over to the Filter menu and select “Neural Filters”.
4. This will open a menu of Adobe Neural Filters available, find the “Photo Restoration” filter in the panel and select it.
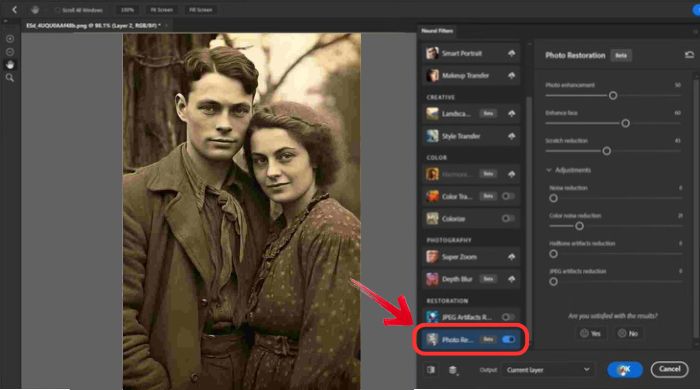
5. With the Photo Restoration filter selected, you will have a few toggles on the right panel. Adjust these toggles accordingly; if you want to enhance the quality of the image you will need to adjust the “Photo Enhancement” toggle.
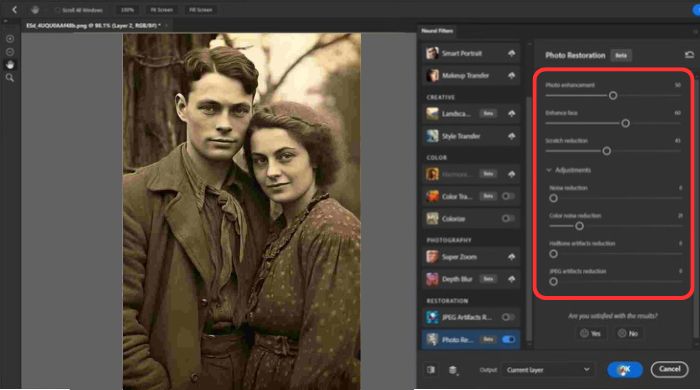
Note: Use the toggles according to your image requirements, unnecessary use can make the quality of the image poor rather than enhancing it.
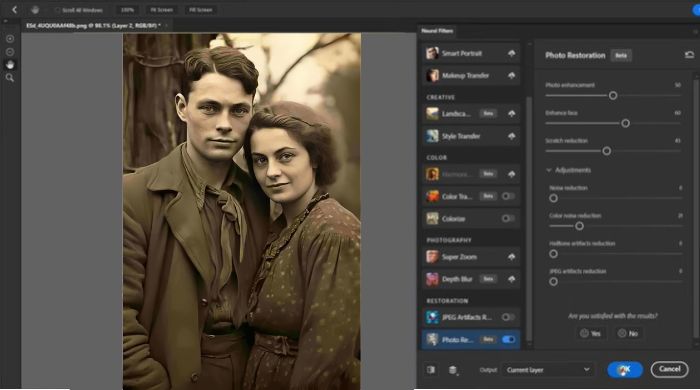
6. You now have the image restored, removing all the scratches, enhancing the quality, without the need of going through the advanced photo tools Adobe is known for, making the process simpler with easy-to-use Neural Filters.
Pros
- Professional grade results
- AI integration
- Colour Restoration features
- Photo restoration customizable options
Cons
- Learning curve
- Subscription based
4. How To Restore Old Photos Using Picsart
Picsart too has a phenomenal photo enhancer and a photo restoration tool that claims to bring back the lost light in your photos to revive the joy and life of it! Its photo restoration is very similar to BeautyPlus where it focuses on bringing more clarity to the picture by removing any blur and enhancing the photo quality so it seems that it was taken in the modern era.
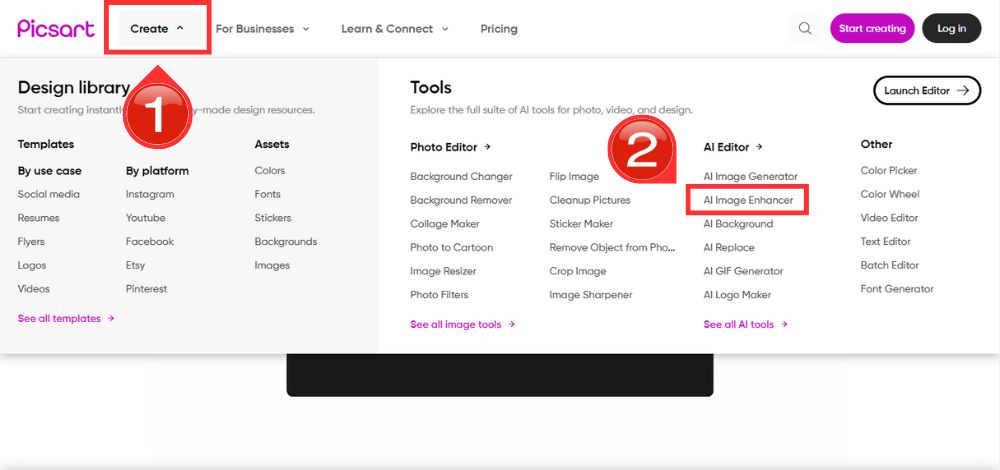
1. Open the picsart homepage on your preferred browser and find the “Create” tab the first thing at the top. From there, in the Tools section find a sub-section for AI Editor, where you will then proceed to find and click on “AI Image Enhancer”.
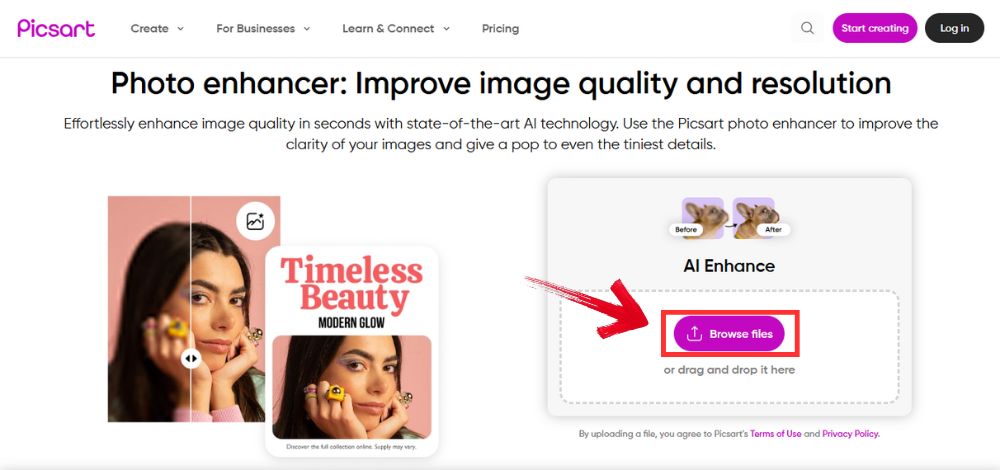
2. If you want to directly access the photo restoration tool, simply go to the photo restoration tool, and upload your picture to get instant results
3. You can simply upload your picture, after clicking on the “Upload” button, which will increase the resolution and clarity of the picture.
Pros
- Compare results feature
- All-in-one tool
- Easy to use
- Offers additional editing features
Cons
- Ads in free version
- Limited blur removal
- Requires internet access
5. How To Restore Old Photos Using VanceAI
Vanceai brings the photo restoration service on a digital platform that delivers results almost as perfect as you would expect to get from a professional studio. The only difference in the results you will get from Vanceai vs a professional is that it is free, barely takes any time and does a more customized job. Now we know that most photo editors that we talked about offer relatively the same service, so what makes Vanceai stand out?
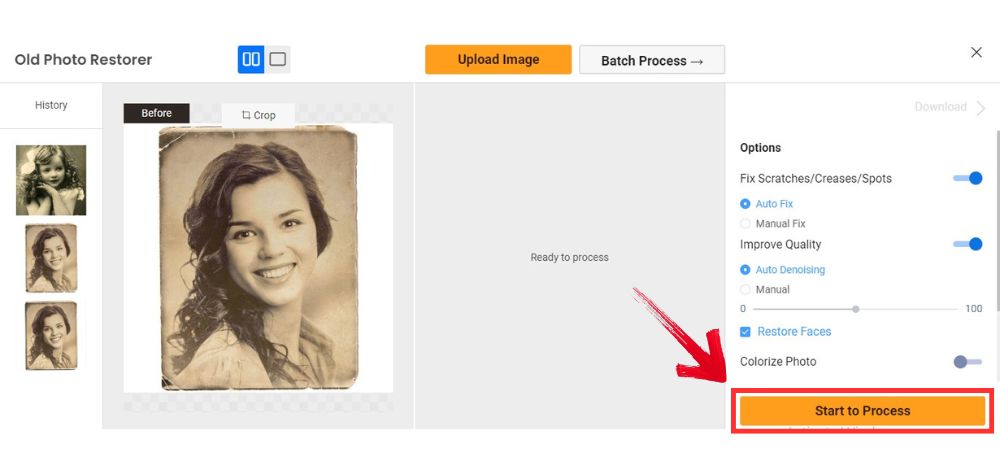
VanceAI has customizable options after restoring the photo where you can proceed to opt for Fix Scratches/Creases/Spots, you can choose to perform either manual or auto adjustments to the photo, you can also choose to opt for improved quality by selecting the options of either “Auto Denoising”, or reducing noise manually. All of this gives a fair share of freedom of control over your pictures regarding the extent of restoration.
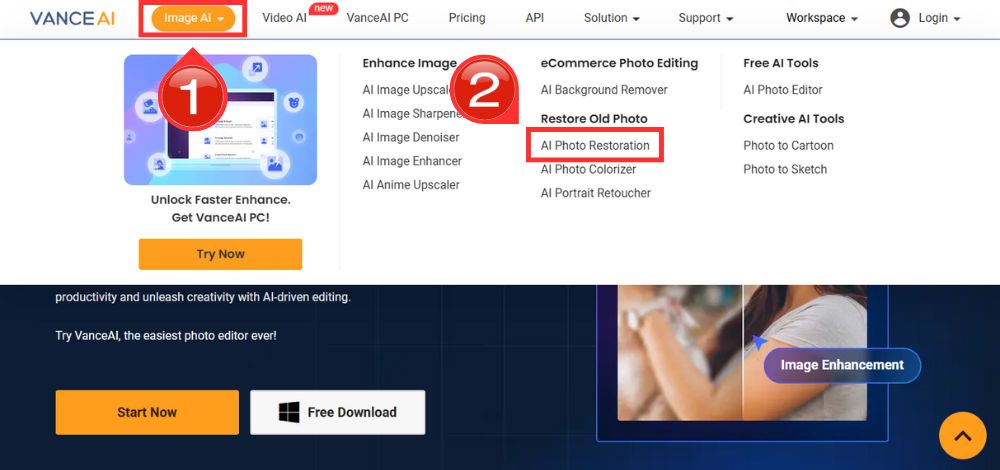
1. You can either go to the VanceAI Photo Restoration webpage: VanceAI Photo Restorer, or you may open the VanceAI Website>Image AI and choose the photo restoration option from there.
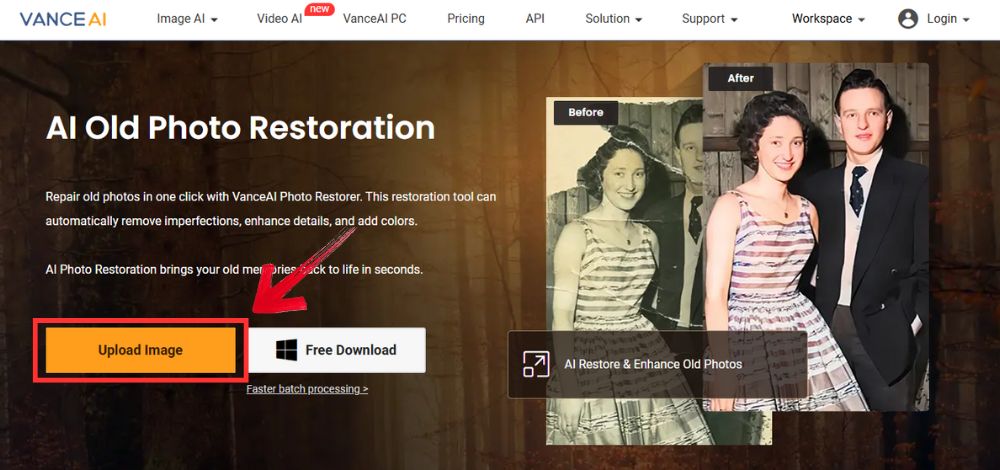
2. The page will prompt you to upload your image by clicking on the “Upload Image” button. Upload your image from where it will redirect to a photo editing page.
3. On the Old Photo Restorer editing tool you have options for manual and auto adjustment to the right. Adjust or select your requirements and click “Start to Process” to see the results.
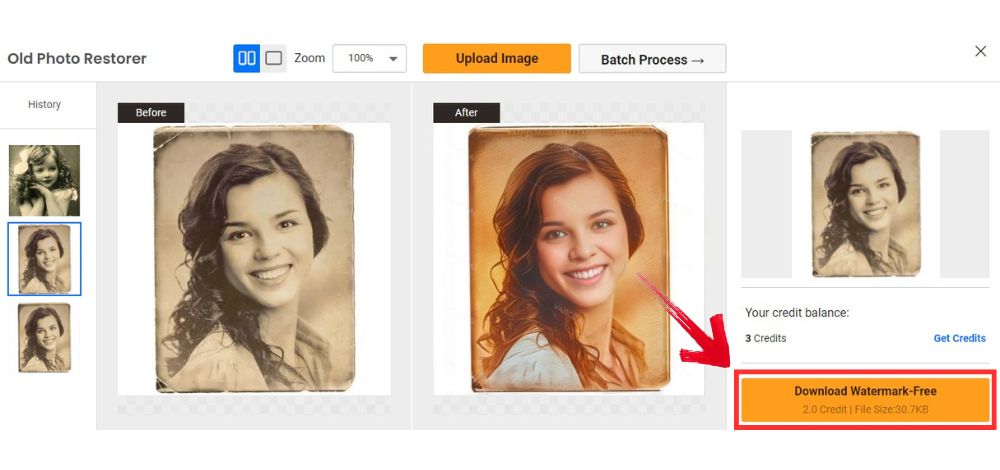
4. To the top right you will find the “Download” button, click it to begin the download process
Pros
- Noise reduction
- Free to use
- Customizable options
- Easy to use
Cons
- Free limitations
- Learning curve
Bottomline
Had it been a year or so back, the process on how to restore old photos would have been very different and much more complicated. Today photo editors are equipped with AI tools enabling not just an automated performance, but better and faster!


