How to Take a Professional Headshot: Tips and Tricks!
In today’s world, where everything works digitally, a professional headshot is very important as it serves as a visual introduction for your personal branding. It is mostly required for online platforms like LinkedIn or job applications. A good professional headshot reflects your personality, confidence, and professionalism.
The good news is that you do not always need to hire a photographer to take the perfect professional headshot. You can do it at home even with a phone as long as you know the right techniques. Let us discuss how to take a professional headshot at home.
Part 1: How to Prepare for Professional Headshot Tips
1. What to Wear for a Professional Headshot?
Your outfit for a professional headshot matters the most. It reflects your personality and your professionalism therefore you must be very careful while choosing the right fit. Here are some things to keep in mind before deciding on the final outfit:
- Do not wear flashy or multi-colored clothes as they can make you look tacky and unserious. Such clothes also draw attention away from your face. Hence, wear solid colors that will make you look more decent
- Go for something that speaks about your profession. For instance, if you are a lawyer then you should wear a suit but if you are a designer, wear an elegant yet simple outfit
- You can also layer your outfits to add more texture to make the outfit look more flattering but do not wear too many accessories Like necklaces as they can serve as a distraction
- Choose a color that goes well with your skin tone and the photo background
- Most men are confused between wearing a tie or not. In modern times, not wearing a tie is fine as long as your shirt is completely buttoned up. Even if you choose to wear a tie, go for a solid color or one with a minimal pattern
Once you are done with deciding on the final outfit, try it on before going for the headshot. This will help you estimate whether you need any alterations or what kind of layering will go well with the outfit.
2. How to do Makeup and Skincare for a professional headshot?
You must look polished in your professional headshot. For this, the right makeup and skincare is important as your face is going to be the main focus in the picture.
- First, you need to start with skincare so your skin looks glowing and healthy on the day of the photoshoot.
- The main skincare steps for this include Cleansing, Exfoliation, and Hydration. Cleanse your skin every day with a gentle face wash. It will get rid of any impurities and minimize the risk of acne on the skin. Then exfoliate it with a gentle scrub once every week. Lastly, use a moisturizer every day to hydrate your skin sufficiently
- Keep the skincare as simple as possible as using too many products can be overwhelming
- Drink plenty of water to make your look clearer and sleep for at least 8 hours before the final day to look fresh
- Now comes the makeup. Keep your makeup light and natural because heavy makeup might make you look artificial and caky
- Go for a matte look as shiny products like a highlighter or a lip gloss will reflect off causing distractions
To ensure that nothing goes wrong on picture day, take a trial with your makeup artist and click some pictures to see the final results. This will help you choose whether you want the same look or if it needs any changes. Investing a little time and effort before D-day is better than getting disappointed about your final pictures.
3. Background of a Professional Headshot
Once you are done with deciding the final look, it is time to choose the background for a professional headshot. Here are some do’s and don’ts of choosing the background:
- It is totally up to you to choose an indoor or outdoor background for your headshot. Just communicate with your photographer beforehand about what you want and what you expect so that can adjust everything accordingly
- Choose a background that suits your outfit. They both must be in contrast with each other so that you do not blend in with the background. Also ensure that your hair does not match with the background color. For example, for dark-colored clothes, go for a lighter background
- The setting should reflect your profession. Mostly, for lawyers and corporates solid backgrounds work the best. In contrast, if you are a creative designer and wearing a causal outfit, go for a natural background setting
- For solid colors, do not choose very bright or vibrant colors as they can be discomforting for the eyes. Select neutral colors like gray, white, or beige
- The background must not have too many elements in it. In simple words, it should not be very textured as it can cause distraction

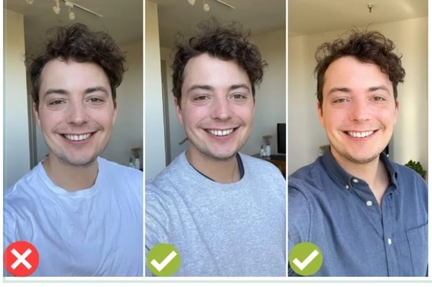
4. What are Professional Headshot Poses?
Not everyone is confident when it comes to posing while taking any pictures. So, it can be even more worrisome and overwhelming to decide on a pose when you go to take a professional headshot. Do not worry because we have got you covered!
Here are some tips and tricks you can try while posing for your headshot:
- First, you need to decide what kind of image you want to create in someone’s mind about you. This will help you decide on a pose and your expressions easily throughout the photoshoot
- Maintain a good posture! This means you must sit/stand straight with your head straight up and no hunching
- Most people go for the standard pose in which they are standing at an angle of 10 to 45 degrees from the camera. To look more friendly, you can bend your arms and smile a bit. A standard pose is mostly suitable for businessmen
- You can make your poses more interesting and natural by adding some elements to them. For instance, hold a book in your hand or a mic and pretend to speak. Such poses work best for doctors, agriculture workers, or those related to educational systems
- There are also candid headshot poses. These poses reflect your true character. For example, get a picture clicked while using a laptop, drinking your coffee, or maybe giving a speech
- And the last tip is to be confident. Maintain eye contact with the camera and stand straight in a relaxed position. If you are confused throughout the shooting duration, the results will not surely be worth your efforts, time, and money
If you are unsure about how to smile during the pictures or what pose will suit you the best, try practicing it beforehand. Stand in front of a mirror and see how much a smile can make you look decent. Try different postures and choose the one that you feel most comfortable and confident in.
Part 2: How to Take a Professional Headshot with Your iPhone?
Hiring professionals to take e headshot is the best option but if you are too busy to go out, or are an introvert, you can also do it at home using your iPhone’s camera. The skincare, makeup, and clothing instructions remain the same as above. Once you are done with preparing yourself, follow these steps!
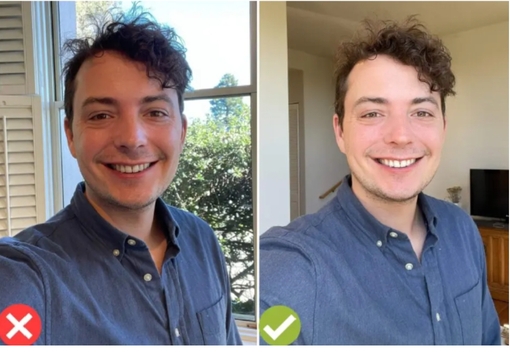
Choose the Right Lighting
You can choose any background whether it is natural or have solid color, but make sure the lighting is good enough to capture a good photo.
- Prefer taking photos in natural light which means sunlight. However, it must not be directly hitting your face and blinding you. Rater, it should be reflecting off a curtain, a big wall, or a window
- The ideal location to take a photo is your window. If there is no curtain and the light is hitting your face directly, stand at least 2 to 4 feet away from the window
- You can click pictures early in the morning during golden hour or in the afternoon when the sun is not in its full swing
- Avoid any indoor lights directly above your head as they can create a shadow
- You can also use a ring light to take pictures
It is usually difficult to find the right location with good lighting at first. To choose the best lighting, stand at different places and see which one has the optimal lighting. You can also stand in a single place and take pictures from different angles to decide what works best for you.
Set up the Phone
Now it is time to set up your phone. Here is how to do it:
- Use the front camera of your iPhone to click the picture
- Your arm that is used to take a selfie can look weird in a professional headshot, so prefer using a tripod or ask someone else to take the picture for you
- Most people choose to use a portrait mode while some prefer using the regular mode for photos. Portrait mode blurs the background while focusing on you. Try taking pictures in both ways to decide the better mode
- Before clicking the picture, tap on your face to ensure that the camera focuses on your face
- Then you need to adjust the exposure. Tap on the phone screen and increase it till it makes your photo more lively and brighter
- Do not use any filters as they can reduce the quality of the image
Click the Professional Headshot
Now it is time to click the photo. For this, follow these instructions:
- If someone else is taking your photo, instruct them to take the picture from above your waist. It must not be taken from too far or too close as they both will compromise the image quality
- If you are taking a selfie, stretch your arm out as much as possible so that the photo can be cropped out later. Also, hold the camera horizontally so that the bottom of your ribs and the photo align with each other

- Hold the phone at your eye level with the camera tilting about 15 degrees downward for a selfie
- Take multiple photos with you smiling lightly or your teeth showing in the smile. You can also try multiple photos and decide the best headshot later on
- You must be in the center of the screen. For this, turn on the gridlines and stand in the middle one
- Turn on a timer to give yourself enough time to adjust after tapping on the “Click” button
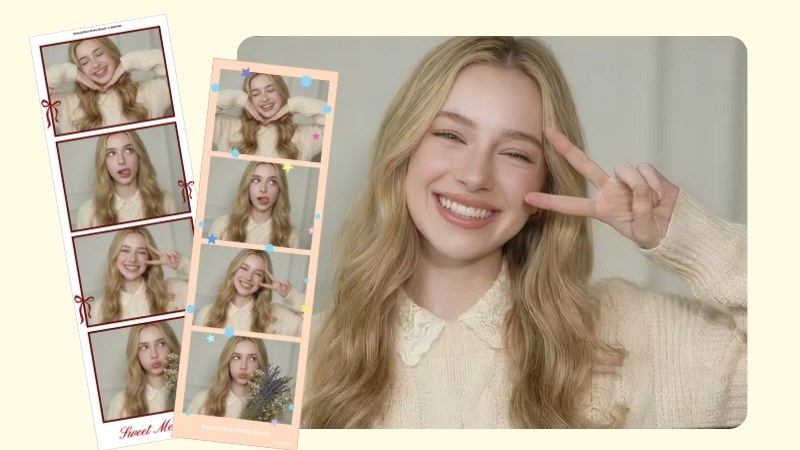
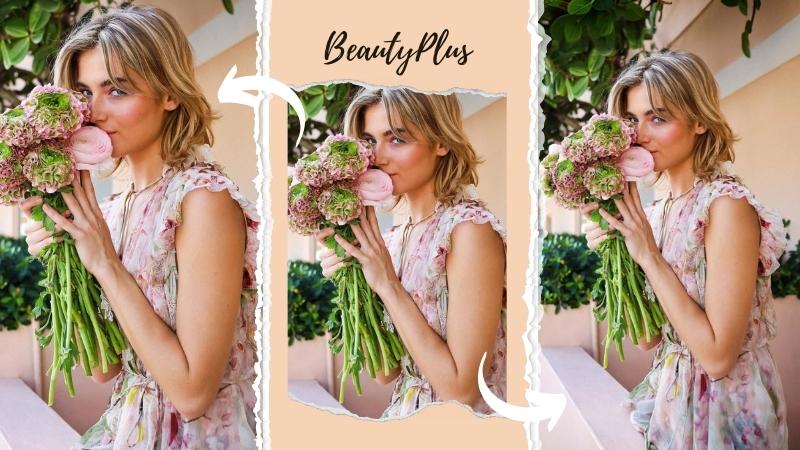
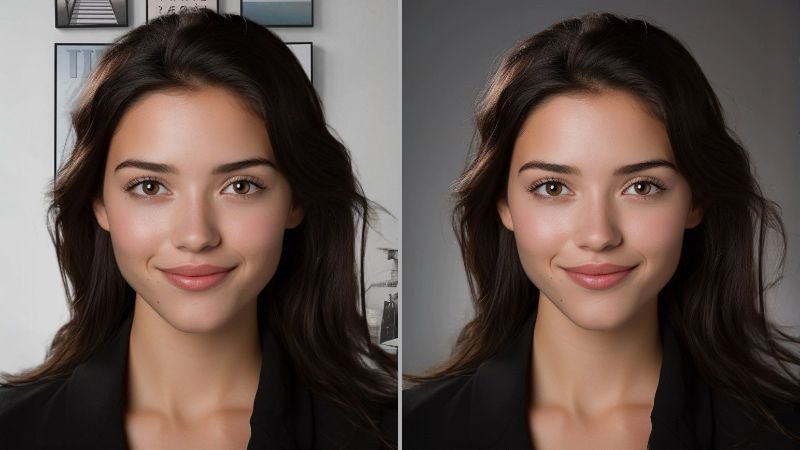
Part 3: How to Enhance Your Headshot with the Beautyplus App?
You can use the BeautyPlus app to make changes to your headshot, adjust all the flaws, and make the picture look more polished. Here are the features of the app that can help you achieve your desired results easily!
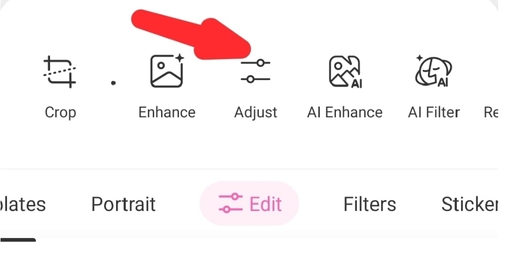
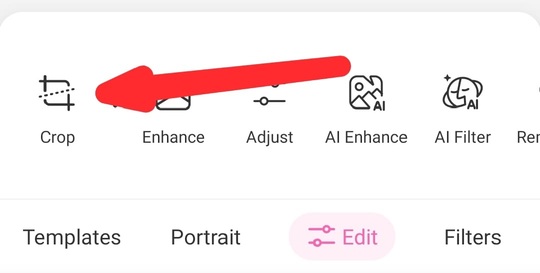
Adjust the Brightness and Contrast
Brightness and contrast adjustments in the headshot will make it look more vibrant and lively. It will also add depth to the image thus enhancing the image clarity. Here’s how to do it:
- Download the BeautyPlus app and tap Photo
- Select the photo that you want to edit and click on the “Edit” option
- Tap on Adjust and choose the required brightness and contrast settings
- Click Save to download the edited photo to your device
Skin Retouching
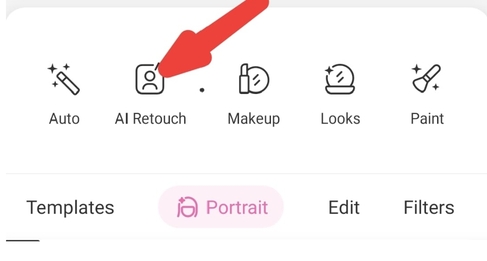
Worried about your acne, wrinkles, or blemishes appearing in your professional headshot? Well, you can use the BeautyPlus skin retouching feature to make your skin look smoother and conceal any flaws. For skin retouching:
- Choose the required photo and tap Portrait
- Cclick on “AI Retouch”
- You will be provided with various options like Classic, Daily, Charm, etc for your skin to look better
- For acne, there is a separate option in Portrait that allows you to blur it
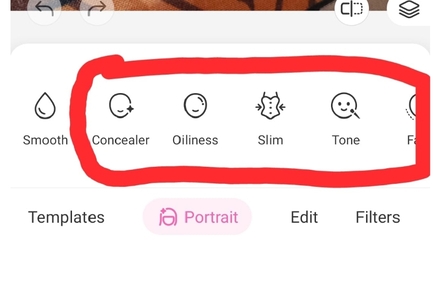
Enhance Facial Features
The tool also allows you to enhance your facial aspects to create a more appealing look. A good thing about the app is that it does not make your picture look overly edited. To use this feature:
- In the Portrait option, there are options next to AI Retouch to enhance your facial features
- You can choose to change the hair color, use a concealer, hide dark circles, slim down your face, eyes resize, teeth whitening, etc
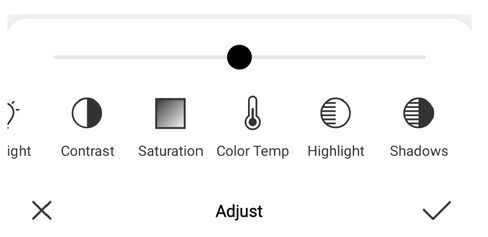
Color Correction
Color correction is important to balance the colors in a picture and make the headshot look more natural. For this:
- Tap on Edit and go to Adjust
- Change the saturation and warmth of the image for color correction
- You can also choose Vignette to adjust the brightness of the headshot frame
Cropping the Image
Lastly, if you feel that the picture might look good in a smaller frame, you can crop it using BeautyPlus.
- You will find this option in “Edit”
- From there, you can rotate, flip, or customize the size of the image
- You can also customize the Size or a specific ratio
Conclusion
A good professional headshot is important as it reflects your professionalism and helps boost your online presence. Therefore, you must be very careful while taking one. Most people hire photographers for this but you can also do it at home.
All you need to do is choose the right clothes, and background, and focus on your skincare. Lastly, choose optimum lighting and click the picture. Any flaws left in the headshot can be edited using the BeautyPlus AI image editor. However, do not over-edit it as it will make your image look artificial.