How to Pixelate an Image: 4 Free Ways

Remember how back in the day, we had those small 8-bit games with distorted images in game stores or if you were cool enough to own a Nintendo (or old enough)? Well, that was nothing short of a technical limitation, but it goes by a new name now; pixel-art. And there are quite a few degrees to it too. A style that continues to captivate and fascinate creators and artists all around the world.
And if you too are equally fascinated but think that you lack the skill, well think again. Because today you’re in luck, as there are several tools that can help you make one. To save you the trouble, we have gathered the best tools and created this simple guide on how to pixelate an image using methods that work across different devices and platforms.
How to Pixelate an Image on iPhone
The iPhone’s camera has been a centre of discussion for some time now. From high-quality lenses to advanced camera features, iPhone cameras are something everyone eagerly awaits every September to especially see what new features iPhones brought to their camera. But it’s not just their cameras that get an upgrade each year. iPhone continuously strives to improve the user experience, offering new and better features in almost all its default apps and thus surviving the brutal winds of technical competition.
You would be happy to know how easy it is to learn how to pixelate an image on an iPhone, that too only with its in-built pixelate, erase, or add shapes to images without downloading any additional apps.
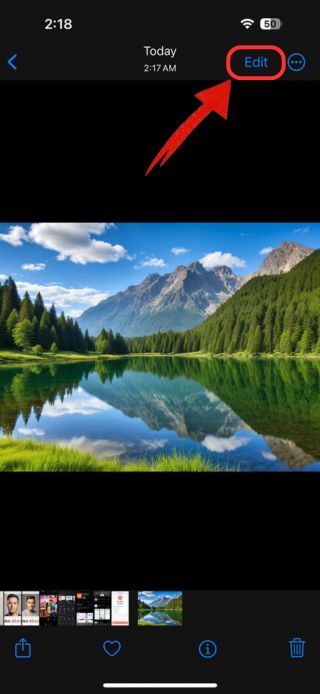
1. Obviously, the first would be to open the photo app. You get to perform all functions to pixelate your photo on your iPhone’s Photos app. Browse through your photos and choose any to proceed clicking on the “Edit” button to begin editing.
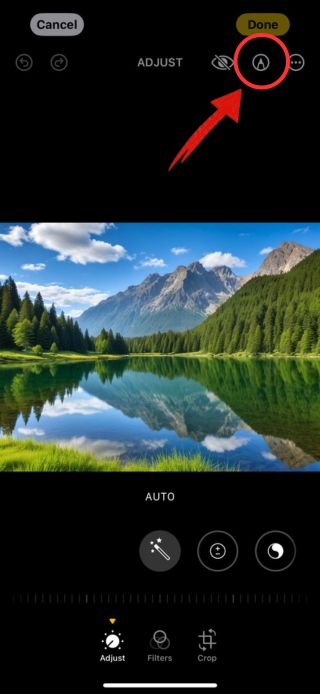
2. You will notice that the Markup tool is quite handy, once you get the hang of it. It has good enough editing tools and also has the Pixel Eraser tool within it, so tap on the “Pen” icon.
3. Out of the five Markup tools, one is a Pixel Eraser tool which you will find at the bottom. It’s the white brush with a pink head. To use the tool, you will have to double-click on the tool to make sure “Pixel Eraser” is selected.
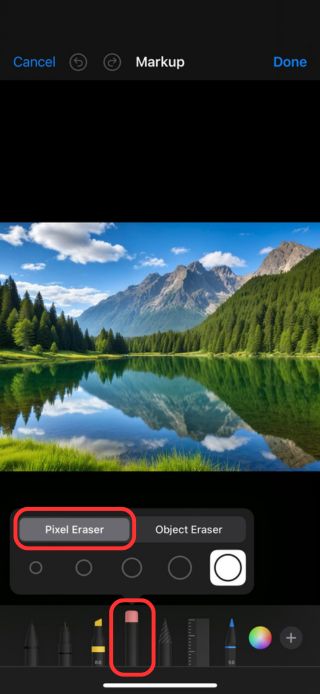
4. Now brush over your image with the Pixel Eraser tool selected, and watch as your image transforms into pixel art with each stroke.
5. Since your job is done to convert a picture into a pixelated image, click on the “Done” button at the top-right to exit the Markup tool and save your edited image in the photos ready to be shared too.
How to Pixelate an Image with BeautyPlus
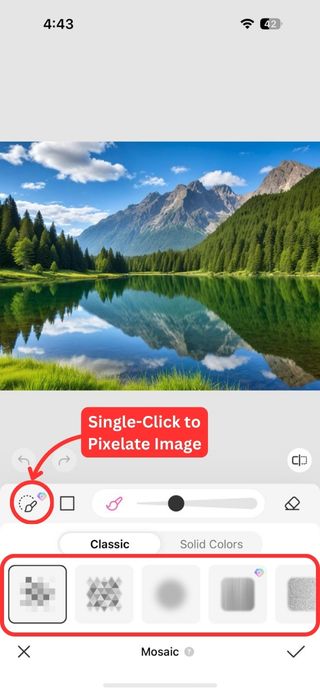
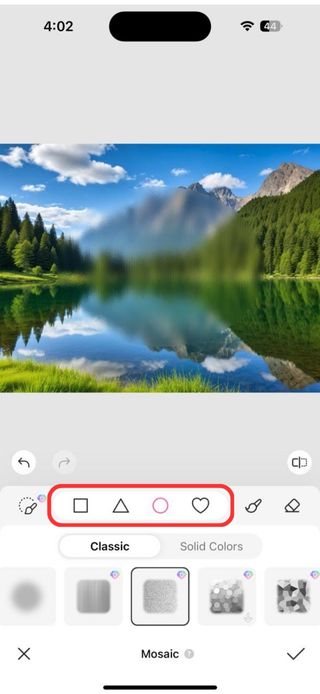
BeautyPlus app provides an easy-to-use and at the same advanced Mosaic tool that you can use to pixelate your images. Not only can you single-click pixelate your image, but BeautyPlus gives you the flexibility to try out different Mosaic filter options, and gives you more control over the process by allowing you to adjust the brush size or pixelate specific shapes, so you can customise the effect to your liking.
1. The BeautyPlus app can not be accessed without downloading it on your phone, obviously, so go to your app store and put it on download.
2. Once the download completes, find the app and then open it on your iPhone to begin pixelating your image like a pro artist.
3. You get the download out of the way, now open the app and click on the downward arrow icon, and you find yourself surrounded by a range of photo-editing, enhancement and even AI tools.
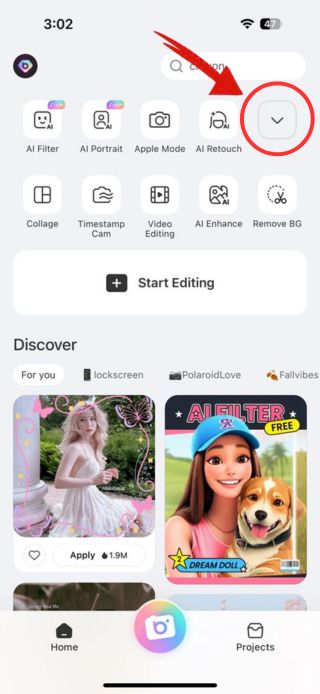
4. Here, you need to keep an eye out for what’s called the Mosaic tool amongst all the listed tools and then tap on it.
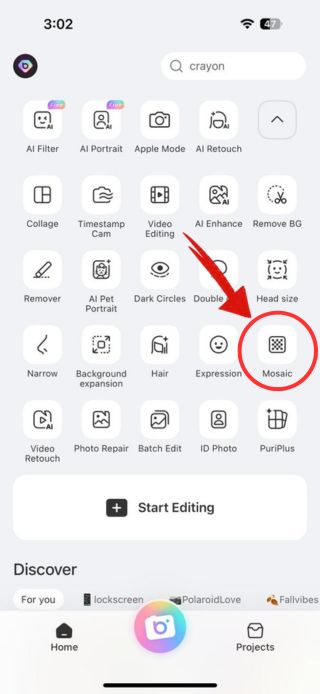
5. The Mosaic tool on the BeautyPlus app is what will give you all the tools you need to pixelate your image to how you like it to be.
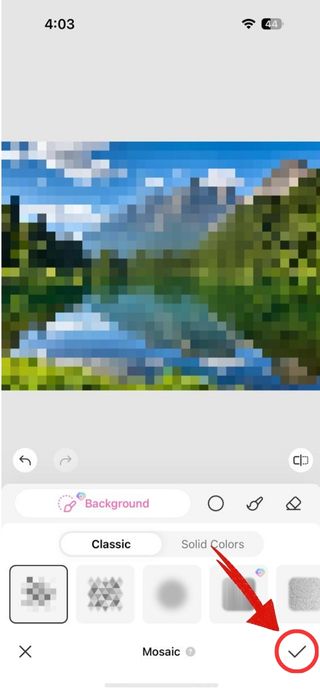
6. You will have so many Mosaic filters to choose from that you can experiment with, and once you finalise that just brush over the mosaic effect on the image or simply click on the “background” icon to one-click pixelate your image.
7. BeautyPlus not just has the brush feature for pixelation, you have the option to pixelate in shapes too. The way you do it is you select the shape you like, then hold and draw the shape on the image to pixelate part of your image with shapes, like round for face etc.
8. Experiment with the many options you have on BeautyPlus, and once you believe you have the perfect pixelated version of the image, tap on the “Tick” icon to exit the Mosaic tool.
How to Pixelate an Image in Canva
We have all used Canva and its vast library of design templates to create visuals before. But very few people are aware of the apps Canva has integrated to allow users to do all sorts of editing and manipulation with images. Among its many integrated tools, you’ll find apps that let you pixelate images – some completely free to use. But then the question arises, “How to pixelate an image in Canva?” It’s not that hard, let us show you:
1. As we know Canva is an online photo-editing tool, and so you will need to open your web browser to access it.
2. Next, you need an image. You can use any of your previous projects to try out the pixelate apps on Canva, or you can upload an image from your PC.
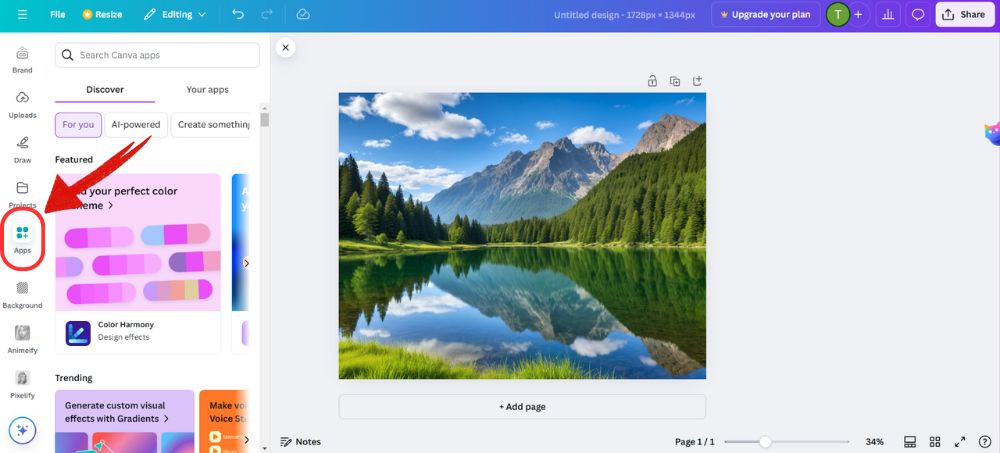
3. With the image now uploaded, you will be taken to the Canva built-in editor. Go over to the left pane, and click on the “Apps” button to find an app to pixelate images.
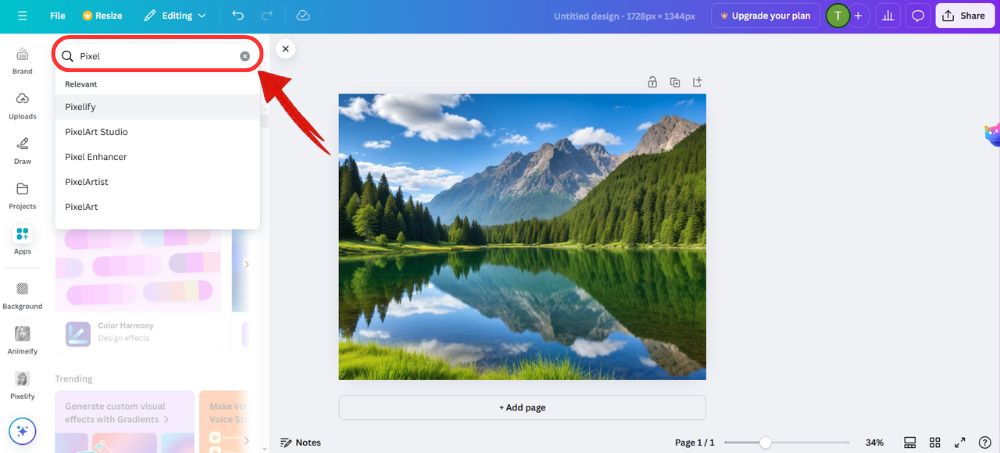
4. Rather than scrolling and searching for an app, use the search bar and type in “Pixel” to search for all the apps that allow to pixelate images on Canva.
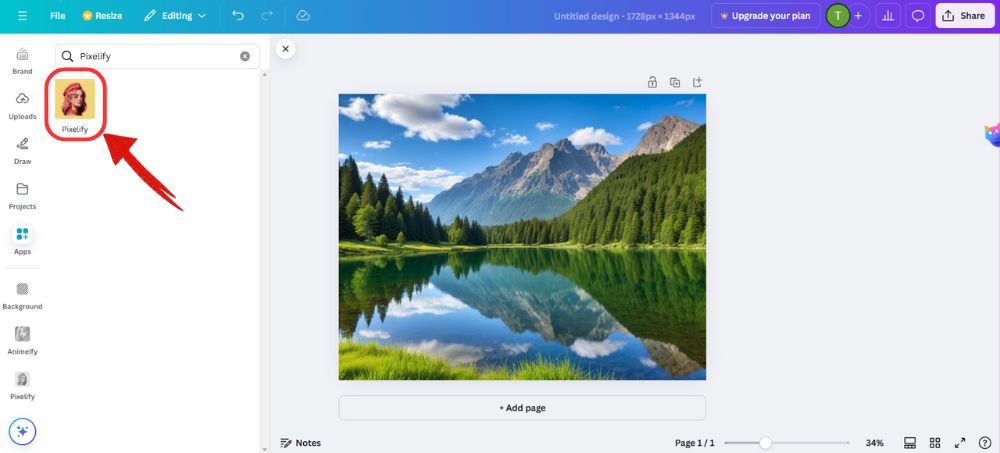
5. For our example, we used the Pixelfy app for the task, however, you can choose any from the list, each tool is a little different in terms of use and functions.
6. Pixelify was quite simple to use; it has a Pixel Scale to adjust the intensity of pixelation of the uploaded image.
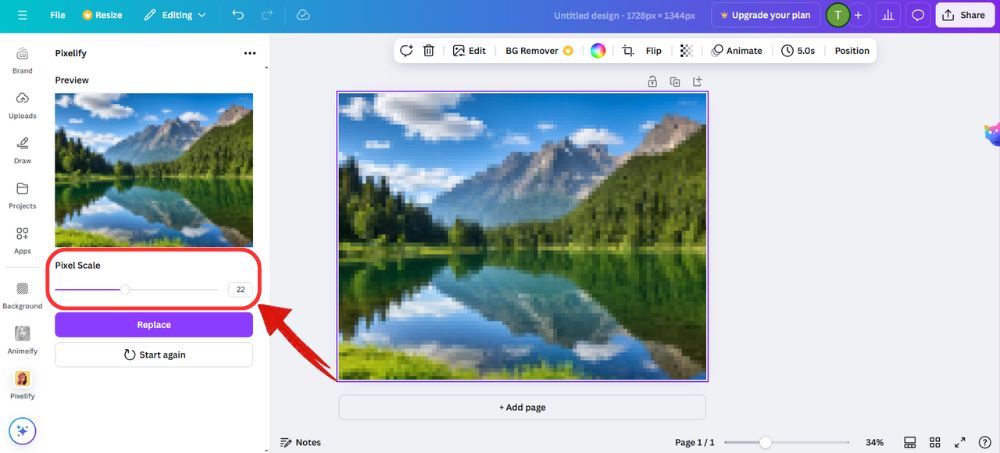
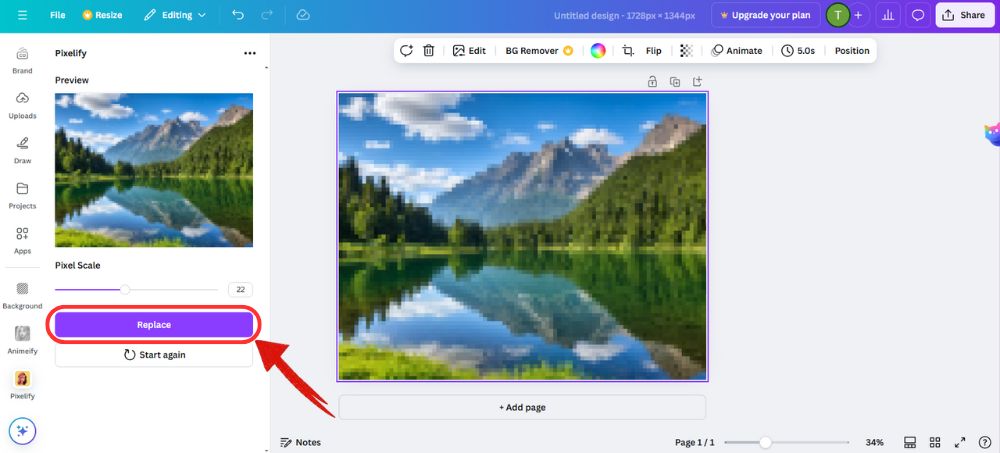
7. It’s really this easy to have your Pixel Scale figured out, and once you think your image is good enough to be ready to go, click on the “Replace” button to save the image.
How to Pixelate an Image in Photoshop
Adobe Photoshop is the most advanced image editing software in the digital space as we speak, and is quite a favourite when asked by professionals. It is safe to assume that Photoshop is capable of any possible photo editing job even when you want to apply pixelate filters to their images, but there can be a learning curve along with high subscription fees, which might make it a less suitable option for many. But if you’re wondering “How to pixelate an image in Photoshop”, then these steps will help you:
1. To begin editing images, you need to open the image you wish to pixelate with Photoshop.
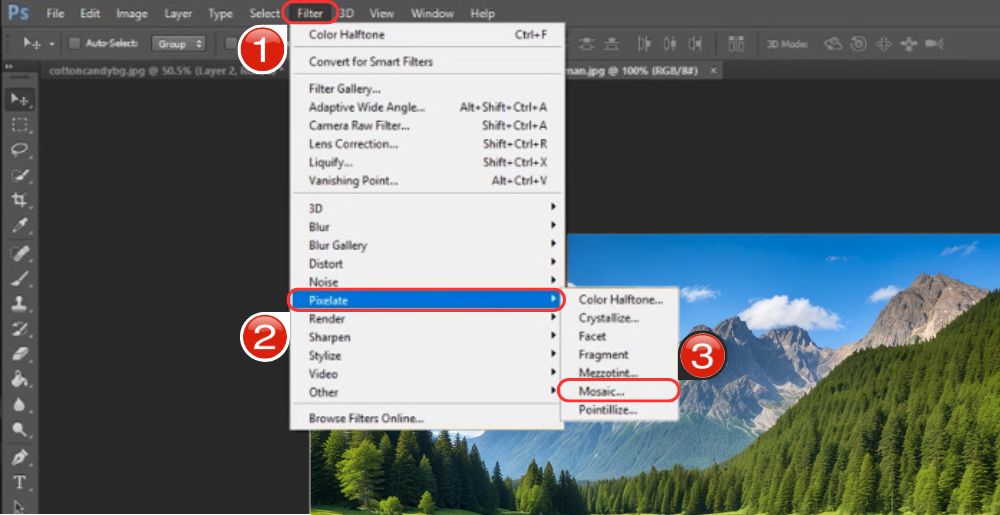
2. Once open, head over to the “Filter” tab in the toolbar and then select “Pixelate” from the drop down menu.
3. A Pixelate flyout menu will open, you can experiment with other tools, but Mosaic is the best Pixelate filter to use.
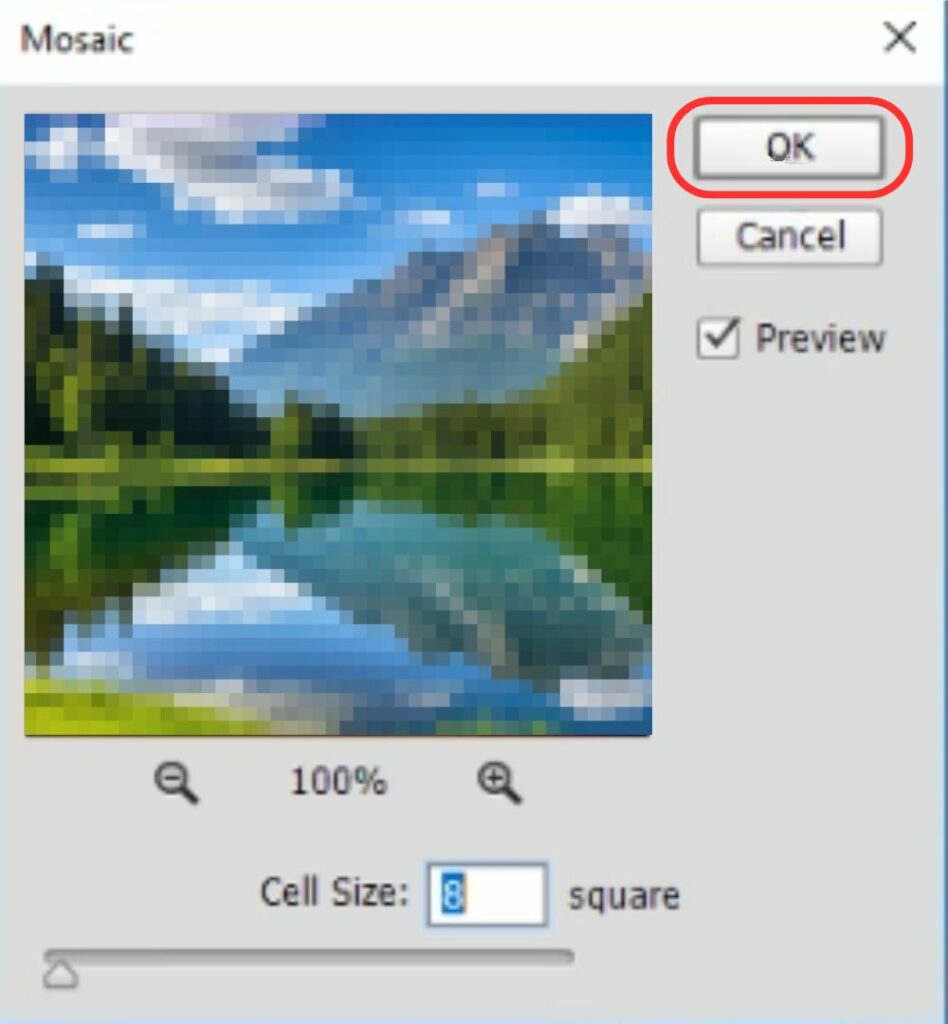
4. A Mosaic window will open, where you can adjust the Cell Size to adjust the intensity of the pixelation before hitting “OK”.
5. Now simply save the image on your PC.
Bottomline
When you finally figure out how to pixelate an image in an instant with any device you have at hand, the degree of fun you can have out of it is truly limitless. Yes, Pixel art is something that fascinates many but it is only fair that you would want to learn it without putting any effort into it. But remember, these tools can only help you so much; when digital tools in any form such as AI are prohibited in an art competition, it is best you represent your genuine effort in your artwork.


