
Snow Overlay: How Can I Add Snow to a Photo?
Christmas is just right around the corner, and people are doing the best in their power to get the best deals out of black Friday sales. And while gifts and food are a big part of Christmas, the spirit of Christmas holidays can get lost in these worldly desires where we forget to be appreciative of the people we get to celebrate our Christmas with and share the joys that come with it.
Postcards for one, are a great way to let your folks know how much their presence is valued. What will add more to this gesture of appreciation is if you design the postcards yourself, adding your personal touch. And while doing so, you wouldn’t want to not miss out on any holiday symbolism, which include snowfall or snowflakes.
After all, every year Christmas comes around in peak winters where it’s usually snowing. So to get the elements in your card, you can use these tools to add snow to photos easily.
How to Add Snow Effect to Photo Online Free
There are just so many photo editors you can find online. And they are not very difficult to find either, a simple search on Google and you have pages and pages of all the photo editors you can use.
But even when you choose the search keyword “free photo editor”, chances are either you don’t find the editing feature that you were specifically looking for, or they charge you with something before you are able to download the file. Fotor, in this regard, is pretty reliable and commendable.
Adding snow overlay PNG to a photo may seem like an inconvenience, but with Fotor, you will have the perfect picture with a beautiful snowfall impression on it ready in no time, so let’s get right to it:
1. Fotor is both a web-based tool and an app, but for today, we will be using it on the web. So hop on to their website and log in to your account, and if you don’t have any it will take a matter of seconds to sign up.
2. On the homepage, you will find the “Photo Editing with AI” tab on the left pane, there click on “Edit a Photo”, to get access to all the photo editing tools.

3. On the Fotor photo editor page, you will be prompted to open one of your photos by a button that says “Open Image”. Click on it, browse and open the picture you want to add snowflakes to.

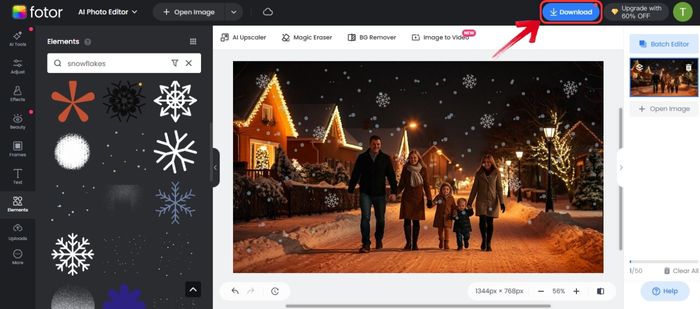
4. Now on the left panel of the desktop version, you will find the “Elements” tab. After clicking on it you will notice a search bar at the top that says “Search Element”.
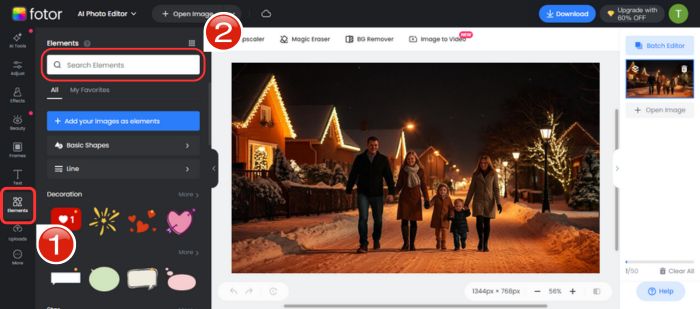
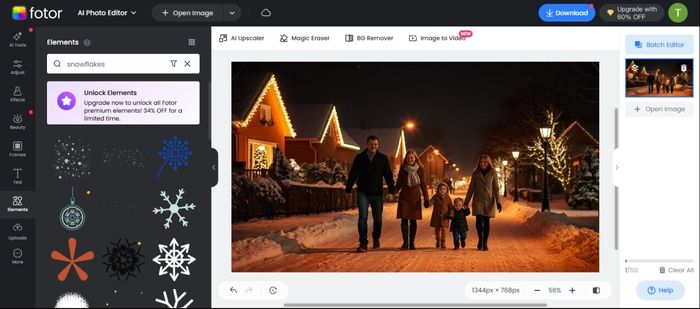
5. In the search bar, type in words like “Snow”, “Winter”, or “Weather”, which will show you multiple overlays offering multiple types of snowfall and snowflakes. Choose the one you like and it will be applied to your picture.
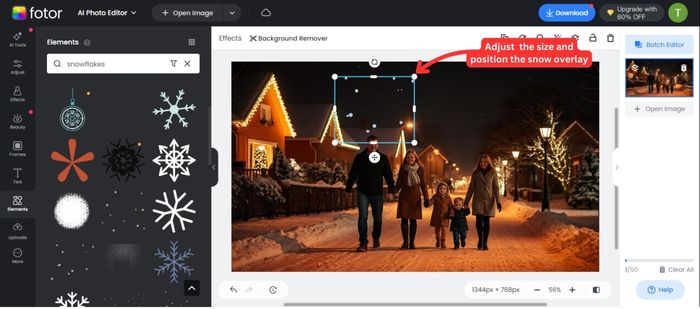
6. Once the snow overlay is on your picture you can manually adjust the size of the overlay .
7. Make any additional edits, like adjusting brightness or contrast, to enhance the winter vibe of the picture, and click download at the top right, once you feel the picture is ready to be saved and shared.
How to Add Snow to a Photo in Beautyplus
BeautyPlus is also a web-based tool, but it also comes in a highly compatible application that is equally efficient if not more and is compatible with both Android and iOS. BeautyPlus is known to have one of the best AI abilities compared with many multiple online photo editors.
BeautyPlus brings its vision to life with next to no effort required and when you struggle to add overlays to your pictures to fit them into a certain aesthetic, BeautyPlus lives up to it fully. And so even when you think there’s no last resort to adding free snow overlay to your photos, BeautyPlus won’t disappoint and if anything, it will allow your picture to look the best it’s ever been by adding a falling snow effect to photos online.
1. Launch the BeautyPlus app on your device and tap “Start Editing” which you will find placed at the centre of the app’s interface to begin.

2. Browse through your gallery and select the photo you want to add free snow overlay to.
3. From the editing tools at the bottom, tap “Brushes” to access different brush effects.

4. Scroll through the brush options stop and choose the “Dream” category where you will further select any of the Snow Effect brushes.

5. Use your finger and swipe across the screen to brush the snow effect onto the areas of the photo where you want to add falling snow overlay, you can then adjust as needed for a natural look.
6. Once you are finally satisfied with your result, tap the checkmark or save button to finalize your edits and save the photo to your device or share it directly on your social media.

How to Add Snow to a Photo in Photoshop
Photoshop has been around for quite some time now, probably the tool which got many people into photo editing in the first place. And it’s a no-brainer not to use the tool for professional editing, the tool literally has every tool in the photo editing tool book, no wonder why companies and freelancers are all so independent on it to get their jobs done.
But the tool, if you’re not familiar with it, can be a bit difficult to work your around it, especially if you’re to add a little dash of Christmas cheer to your picture by adding a snow overlay. If you have the tool open with you, you won’t really find “add snow” button anywhere on the toolbar, but there is a way which you too can master by following these steps:
1. Get your PhotoShop ready, with the photo launched to add the snow effect.
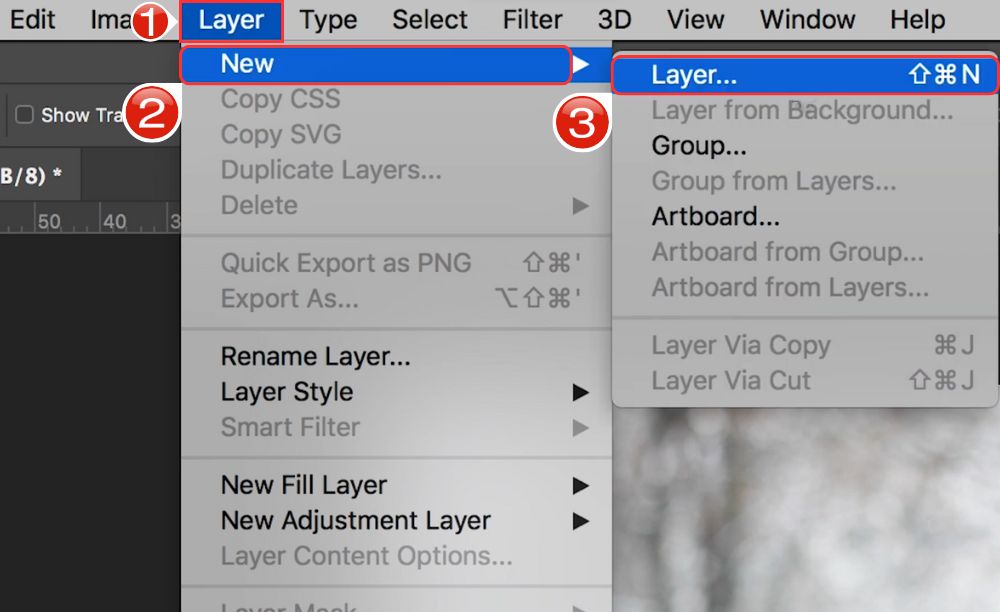
2. In order to start the process of adding the snow effect we want to begin by creating a brand new layer. So we’ll go up to the “Layer” tab and then select New>Layer from the drop-down.
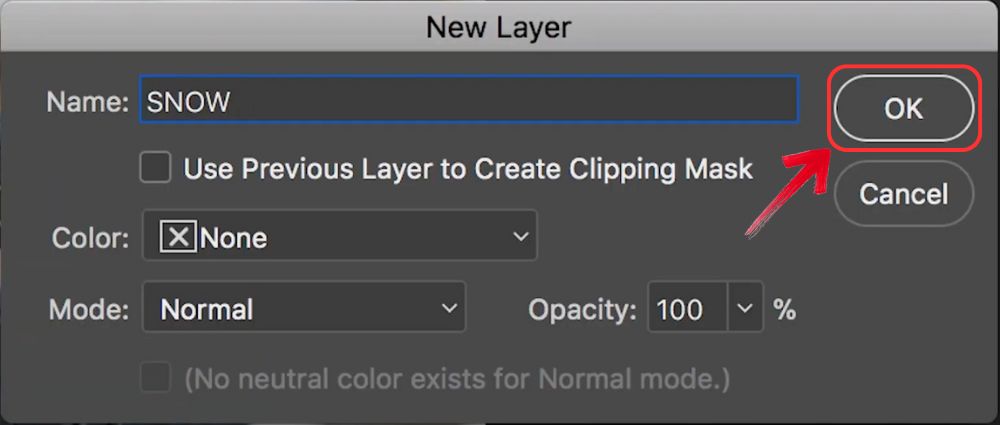
3. You will have the New Layer dialogue open, click “OK” or if you wish to customise it by giving it a name, rename it before clicking on “OK”.
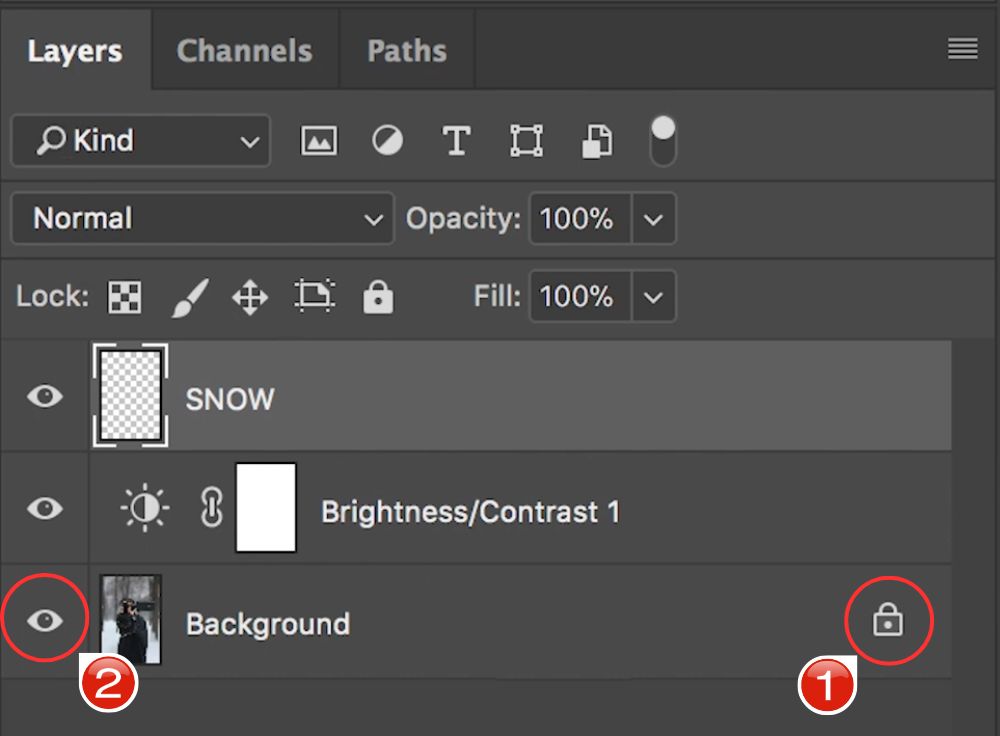
4. With the new layer added, we will turn off the background layer. Click on the “Lock” icon to first unlock it and then click on the “Eye” icon to turn the layer off.
5. Now go to the tools pane on the left, and select the “Paint Bucket” tool. Make sure the colour picker is set as “Black”.
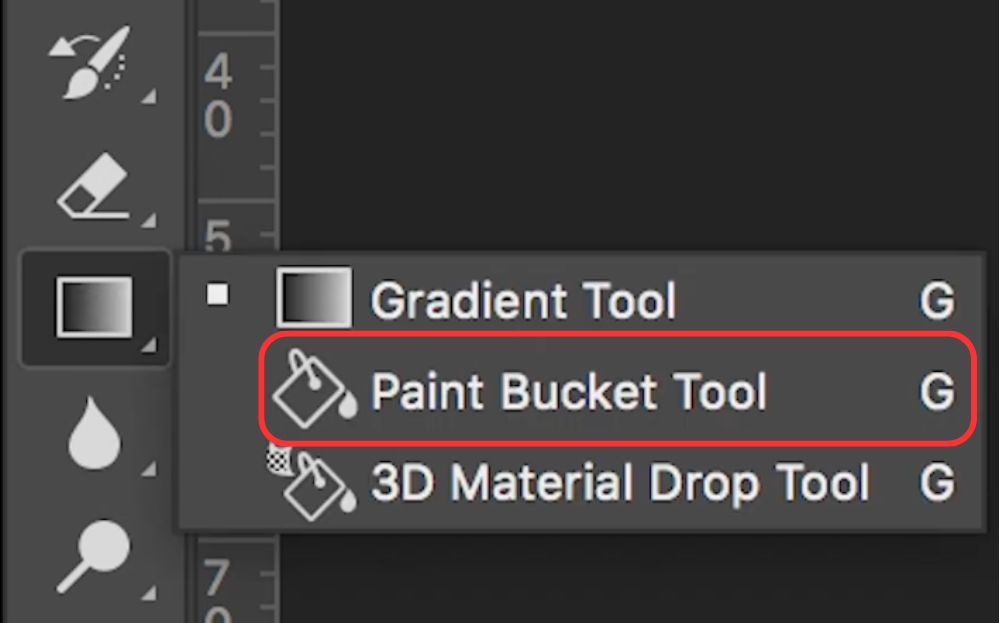
6. Now let’s colour the new layer that we added using the Paint bucket we selected.
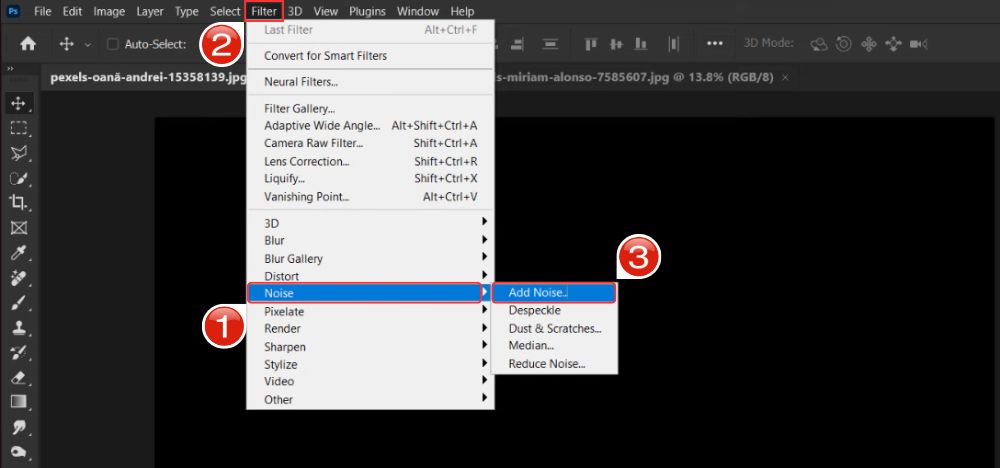
7. The black canvas is prepared and ready, let’s move forward and add the snowy effect next. We will do this using the “Noise” filter to create a snowy-looking effect, head over to Filter > Noise > Add Noise.
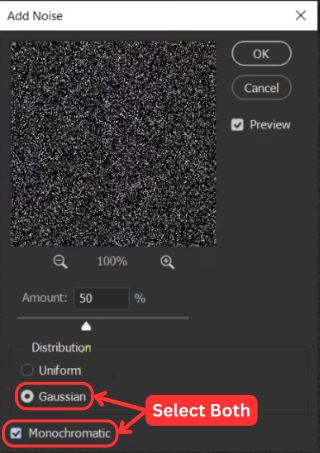
8. The snowy effect can be made more impactful by selecting the Gaussian and Monochromatic options, this way the effect will be in black and white.
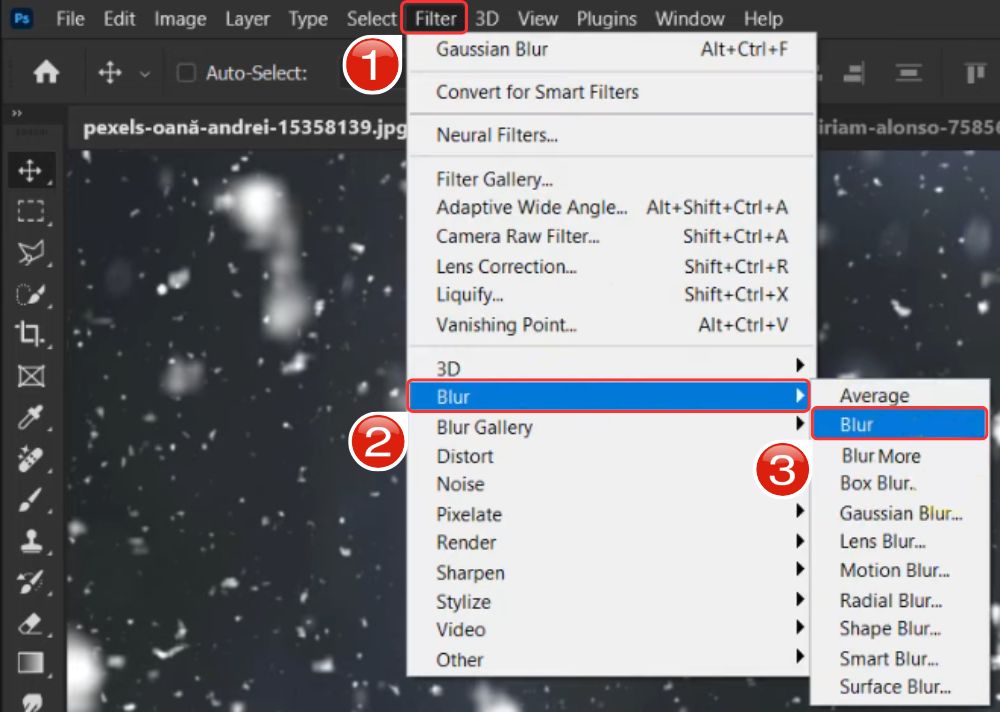
9. We have the Noise effect, next let’s soften the noise a little to make the snowy effect a little less pronounced. You can do this by blurring the photo using Filter > Blur > Blur for a quick fix.
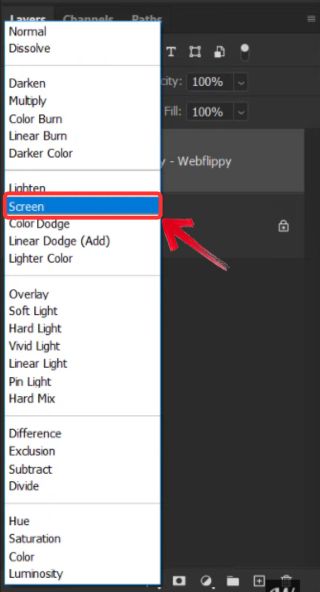
10. Right after softening the noise, we will be blending the layers, this will help us remove the black areas and highlight the white “snow”. Simply set the Blend mode to Screen, and you will have the black background replaced with your background image, bringing the white “snowy” details forward.
11. You can either stop here, or go an extra mile by using the Motion Blur filter to soften the look.
Bottomline
When you finally get comfortable with the process of learning how to add the falling snow effect to photos online, which is also regardless of the method you choose to employ, you will find yourself in a position where other editing features are equally as easy. This will allow you the space to grow as a photo editor or a content creator and eventually produce better pictures as you learn with time.

